Showing posts with label Nikon D40. Show all posts

Friday, December 5, 2008

Adobe Photoshop Lightroom 2: Portrait tricks

Good photos begin with good technique. More than having a capable camera and great equipment, it's all about mastering the nuances of composition, understanding the capabilities of your equipment, and knowing how to capture the situation and subject. But even in the best of cases, it's good to know that you can use tools that'll help you lift the quality of your image just enough to push it into 'exceptional' territory.

The capability of today's digital cameras to resolve the tiniest of details in a scene can actually be detrimental--with their multi-megapixel sensors and high-quality optics, digital SLRs are especially relentless when it comes to capturing the good and the bad in a subject. With portraits, you can capture the colored serrations in your subject's iris as easily as the blemishes on their cheeks or the discoloration in their teeth. So while some schools of thought might deem this to be cheating, I say why not use technology to flatter your subject--be it a beautiful friend, a stunning landscape, or a luscious plate of chocolate cake!

Photoshop Lightroom 2 offers a great set of tools for touching up your photos--you can be as subtle or blatant as you want. Here are some of the tools I use when it comes to portrait photography, so that I can show my subjects in the best possible light (pun intended!).

For portraits:
When it comes to touching up portraits, I use the following tools in Lightroom 2 to make a few subtle changes that can make a stunning difference. Note that I first went through the basic image correction procedures as described in my previous blog post.
capture_05122008_012557

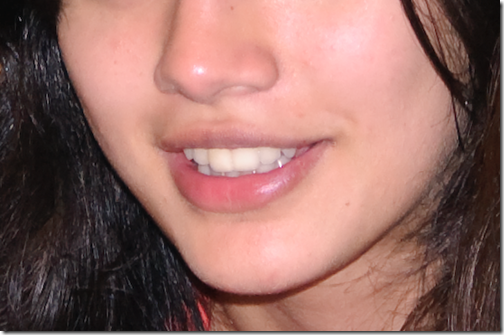
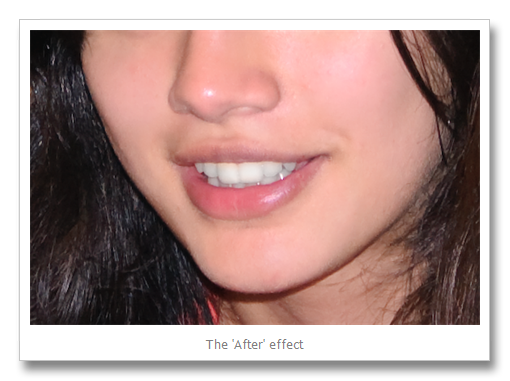
We'll first start by analyzing the photo and determining what needs to be fixed. In the picture above, the subject has great features to start with, but there are a few tiny aspects that can be fixed including blemishes, skin oiliness, and a slight discoloration in the teeth. To add a touch of glamour, we can also impart a bit of 'glow' to the skin. Now that we know what to do, let's dive right in!

1. Spot Removal: Go to the the Develop module and hit the [N] key, or click the Spot Removal icon beneath the histogram. Next, change the size of the reticle by using your mouse scroll wheel (if present), or the box bracket keys '[' or ']'. Make this reticle slightly larger then the skin blemish you want to eliminate. Click-hold on the spot, and drag the mouse to a clear patch of skin. You'll see the clearing effect in real time--leave the mouse button when you're satisfied with the effect. Repeat this process for all spots on your subject's face. The circles in the adjoining photo represent the locations where I used spot removal. Press the 'H' key if you can't see these markers. capture_05122008_012807
2. Skin smoothening: This is perhaps one of the most powerful effects you can use for portraits. In Lightroom 2, you can use the Clarity component of the Adjustment Brush in the Develop module. Press the 'K' key to access this tool, then enable the 'Show Effect Sliders' toggle switch. Click the Effect drop-down menu and select Clarity. Now drag the Clarity slider down to about -70, and set the Flow slider to 40. Remember: the lower the Clarity slider, the greater is the effect of the skin smoothening. Flow controls the intensity of the strokes while using the tool. Remember that you can also vary the Clarity later, because it is basically a layer mask whose intensity can be changed--all thanks to the fact that effects in Lightroom 2 are non-destructive.
To use the Clarity tool, click once on the image to enable the tool, then select an appropriate brush size (as described in point 1), and 'paint' across the skin areas only. Avoid using this tool on the eyes, mouth and other facial areas that have detail, because you don't want these areas getting blurred.
capture_05122008_013514
Hold the mouse pointer over the marker to see the areas you've affected (indicated in red). To erase the effect over a particular area, press the [ALT] key and paint those areas. Use this method to bring back clarity into areas you might have mistakenly smoothened. capture_05122008_014806
3. Dental magic: Give your subject a Julia Roberts smile in a jiffy! Once again, we use the Adjustment Brush, but this time we select Saturation from the Effects drop-down list. Drag the Saturation slider down to -100, and select a nice white color from the color patch. Also, check Auto Mask.
To use the tool, click once anywhere on the teeth area to enable the tool, then select an appropriate brush size (as described in point 1), and 'paint' across the teeth areas. After you've finished, hold the mouse pointer over the marker to see the areas you've affected (indicated in red). Use the technique described above to subtract this effect if you need to.
The teeth should now look visibly brighter. Be careful not to overdo this effect--vary the flow and make sure to leave a hint of color in the teeth. Overly white teeth can look unnatural and eerie!
capture_05122008_015641
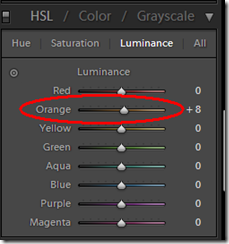
Glowing complexion: Here's a cool trick to add a hint of glow (and glamour!) to the skin. Scroll down the Develop module panel until you reach the HSL / Color / Greyscale section. Click on Luminance, and increase the Orange component to about +8. You'll see a subtle, yet visible difference!
Once again, resist overdoing it or your subject's skin just might begin to look fluorescent!
capture_05122008_020646

That's it! You should now have a much more glamorous subject. The only downside with these tweaks is the number of people who'll hound you to take their pictures, because 'your camera makes them look good'. If only they knew.
Sunday, November 30, 2008

Adobe Photoshop Lightroom 2: Initial configuration

Ok, it's official: I'm hooked onto Lightroom 2. The sheer power of this program, its slick interface, and brilliant attention to user interface makes this the best imaging application I've ever used for my photographs. If you haven't read my initial experience with Lightroom 2, you'll find it here.

The groundwork 
Lightroom 2 offers several methods to help you streamline your photo processing workflow. The following steps will help you set up your Lightroom 2 environment with pre-defined settings that will lift the quality of your photographs during the import process, even before you begin tweaking them! This will let you reach your final result faster. You only need to perform the following actions once--they will subsequently invoke automatically each time you import your photos:

1. Define a camera profile: When I first started using Lightroom, I noticed something strange while importing photos--when each photo first flashed on the screen during the import process, it appeared to have nice, vibrant colors. But after getting imported into Lightroom, they appeared rather dull and faded. I needed to do a fair amount of tweaking with the saturation, highlight and black level settings before I was satisfied with the result. I later discovered that I wasn't using my camera's profile. Lightroom lets you define a profile that is specific to your camera model. Using this profile delivers a significant improvement in color rending, resulting in more vibrant and balanced images, so you'll need to do lesser work to bring your photos to the final satisfactory level.

First, head over here to download the camera profiles installation file from the 'Downloads and Installation' section (free registration required), then install this file. You will now be able to see the camera profile in the Camera Calibration section from the Develop module of Lightroom 2. Click the Profile drop-down at the start of this section, and select Camera Standard beta 2 (I found this delivers the most natural colors). capture_29112008_170943

2. Assign default settings to your specific camera and ISO:
In Lightroom 2, click Edit, Preferences..., and select the Presets tab. Ensure the 'Make defaults specific to camera serial number', and 'Make defaults specific to camera ISO setting' are selected. The significance of these settings will become apparent in the following step.

Lightroom settings_Make default

3. Define sharpening presets: Lightroom 2 features powerful sharpening and noise reduction tools to help you bring out image detail and clean up photos shot at higher ISO settings. The cool thing about Lightroom 2 is that you can create setting presets and bind them to specific ISO settings for your particular camera. This means you could define noise reduction presets for each ISO setting (where you would generally apply more noise reduction for photos shot at higher ISOs), and you can automatically invoke these presets while importing new images: the appropriate sharpening levels are automatically applied to photos according to their ISO. Cool, huh? This capability saves you the time you'd otherwise require for applying noise and sharpening tweaks to your newly imported photos. Here's how you create these presets:

Start by opening a photo shot at ISO 400, for example. Apply the sharpening and noise reduction settings until you are satisfied with the reduction in noise in your photo. The adjacent screenshot shows the settings I use to reduce noise at ISO 400 for my D40. View the photo at 1:1 zoom to be able to see the effects of the noise reduction. capture_29112008_171620
To to save this sharpening preset, click the 'plus' symbol from the Presets section on the left panel. In the box that pops up, make sure to check only the relevant sections that you have modified. Note that besides the Sharpening and Noise Reduction settings, I've also selected the Calibration option so that the camera profile will also be saved in this Preset.
Finally, to set this preset as a default camera setting, press the [ALT] key, and click the Set Default... button at the bottom of the Develop panel. A box pops up verifying your camera model number, serial number and ISO setting. Click the Update to Current Settings button.
Now repeat this step for photos shot at different ISOs, each time saving your Sharpening, Noise Reduction and Calibration settings to a new Preset for each ISO setting, and updating the default settings.
Create preset

That's it for the initial Lightroom 2 configuration. From now on, each photo you import will be automatically processed with the selected parameters according to your specific camera, and the photo's ISO setting. When working with tens and hundreds of photos, you will save significant amounts of time with these settings. Note that these are only presets: you are free to modify these settings while working on individual photos later on.

In my next post, I'll be talking about the basic settings and workflow I use while processing individual photos. Stay tuned!

Update: Click here for the Lightroom 2 development workflow I use while processing RAW images.

Wednesday, November 12, 2008

Adobe Photoshop Lightroom 2: I'm getting hooked...

In a recent post where I wrote about how I process RAW images from my Nikon D40 using Adobe Camera RAW, a reader replied asking about RAW processing tools with a little more chutzpah. I've been following the buzz that's surrounded the recently-launched Adobe Photoshop Lightroom 2, and decided to dive in and try it out.

I'm the kind of software user who builds long-term relationships with my applications. I need to coax myself a fair bit before committing to anything 'new and improved'. When I do encounter something that promises to change the way I live, I go through several phases that include flirting with the new software, reading about its capabilities and other users' experiences with it. It takes a while before I convince myself to toe-in and test the waters.

When it comes to processing images from my camera, I've always known, loved and trusted Adobe Camera RAW. Sure, it's no Swiss Army Knife of image processing, but it's simple, efficient and entirely effective. I've been using it for years and have never really felt the need to use any other solution. But recently, the lure of an enticing new interface,  a workflow-optimized layout, cool new tools for touching up portraits, and advanced photo cataloging capabilities was too much. A couple of days ago, I downloaded the trial version of Adobe Lightroom 2 from its Web site here (free sign-up required), and have been deep diving into its capabilities ever since.

Adobe Photoshop Lightroom 2

Some of the key 'a-ha' points with this application include:

  • Local adjustment brush: You can now 'paint in' exposure, brightness, contrast, even clarity and sharpness. These effects work like a layer mask, so you can also vary the intensity of these effects. And all of these changes are non-destructive.
  • Enhanced organizational tools: The process of importing files from disk or memory cards is quicker and more intuitive even compared to Bridge in Adobe Photoshop.
  • Volume management: You can browse and edit directories, drives and files as you would using a standard file management tool, and easily create quick groups of images.
  • Extensible architecture: Like Photoshop, Lightroom 2 can accept plug-ins written by third-party developers, helping extend its functionality and capability.

Other enhancements to the application include DSLR profiling, multiple monitor support, flexible print options, streamlined Photoshop CS3 integration, enhanced output sharpening and 64-bit support for Windows and Mac OS.

There are hundreds of in-depth reviews about this application out there, so I'm not going to repeat the superlatives that you'll already find in these write-ups. But here are some of the smaller aspects of this software that I personally found fantastic:

Compare views: Lightroom 2 offers several views to help you see the before and after effects of your modifications, including split screen, side-by-side and above-below. Intuitive. Simple.
Hint: Click these images for a larger view.
Compare views
Excellent Sharpening and noise reduction: If you shoot at  higher ISOs, you'll love the new Sharpen and Noise Reduction capabilities. I was amazed as the creamy smoothness of a corrected image, and its ability to retain sharpness. I'd recommend Lightroom 2 for these two features alone. Lightroom 2 | Noise Reduction
Quick development options in the Library view: Instead of having to trundle through the detailed image settings in the Develop module, there's a Quick Develop panel that lets you adjust basic image settings in the Library module. This functionality lets you quickly make broad image modifications before drilling down later. Lightroom 2 | Quick development options
Lights Out: This is one of those features you'll like playing with. Hitting the 'L' key will gradually dim the interface leaving only the image in clear view--great for those times when you want to eliminate the noisy background and concentrate on your photograph. Lightroom 2 | Lights Out
Keyboard shortcuts galore: Its easy to whiz through the interface and get plenty of image processing done quickly, after getting accustomed to the keyboard shortcuts. You can be the Liberace of Lightroom. Sorry, couldn't resist that. Lightroom 2 | Keyboard shortcuts


Lightroom 2 has certainly made RAW image processing a whole lot more fun. And it's fast. To know more, head over to the Adobe Design Center where you'll find Help files and video tutorials. You'll also find a host of informative video tutorials and end-user experiences on YouTube and MetaCafe.

Now I've only got to find a way to cough up the $299 after the 30-day trial period ends. But I'll cross that bridge when I reach it. Get it? Bridge? Adobe? Oh, never mind.

Update: Click here for information on how I set up the initial configuration for Lightroom 2, and here for my Lightroom 2 development workflow.

Friday, November 7, 2008

Streamline RAW image processing

We've already seen the advantages of shooting RAW images here. Next, you'll need to quickly get used to chalking out extra time for processing these images. Depending on how shutter happy you are and how fast your computer is, this could easily run into a lot of extra time--a few hours even. The best way to quicken this process is to get into a groove with processing those images and develop a workflow that lets you crunch through them as efficiently as possible.

First, get to know your RAW processing software. Like any good artist, you need to have a keen understanding of your tools. No matter which RAW processing application you use, read the manual and learn it through and through. The faster you learn the lay of the land, the faster will you be able to navigate it, leaving more time for you to concentrate on tweaking your photos.

capture_05112008_234823 I use Adobe Camera RAW 3.7 (with Photoshop CS2). Camera RAW is a simple, fast and capable plug-in that facilitates RAW processing within Adobe Photoshop. It enables you to access all key areas of the RAW image, including exposure, shadows, white balance, sharpness, saturation and more. You can also crop, straighten and change the white balance in your images. Best of all, these changes are non-destructive--all modifications can be recorded in a separate XML file, so your original RAW images are safe. What follows is a run-through of the process I use while working with RAW images. This is a long post, so brace yourself!
Tip: Click on the images for the full-sized screenshots.

1. After copying the RAW images to your computer, select about 20 images, and drag-and-drop them into Photoshop. This automatically opens them in Camera RAW. You will see the series of images in the vertical pane on the left of the interface. capture_05112008_234930
2. I usually dial in a set of fixed values for Saturation, Sharpness and Luminance Smoothing for all my RAW images. These settings work best with my particular camera--you'll need to experiment and find the best settings for yours. The three image parameters I edit are:
Saturation: 10
Sharpness: 40
Luminance Smoothing: 30
You'll find Sharpness and Luminance Smoothing under the Detail tab.
Note: You can quickly apply these settings to multiple RAW images by selecting them (click any one from the left panel and hit CTRL+A, or press CTRL and click the ones you want to select). Type in the settings and they get applied to all the selected images.
  capture_05112008_235036capture_05112008_235044
3. Now you can begin tweaking individual images. Click on the first RAW image in your series. Start with the exposure--move the slider so that image information (the graph) is evenly distributed through the spectrum. for the majority of your images, you can do this by moving the Exposure slider so that the graph isn't bunched up near the highlight area (the right side) or the shadow area (the left side). Of course, this wouldn't apply to images that are predominantly dark or bright--here, you'll just have to eyeball it and go with what looks natural. After all, a picture of a black puppy outdoors at midnight would naturally have very little (or no) information in the highlight area. capture_05112008_235325
4. Next, nudge the Shadow slider until the left of the graph is comfortably within the area without being bunched up toward the edge. capture_05112008_235356
5. Now move the Brightness slider until you can just about see details in the darkest area of the image. Use your better judgement with this setting--if things begin to look weird, go with what looks natural. capture_05112008_235418
6. Next, you can set the White Balance. The great thing with RAW images is that they totally disregard the White Balance setting on your camera. So even if you selected an incorrect white balance value while shooting the image, you can fix it here without any loss in quality. Click the White Balance tool (the third icon from the left, above the image area). Next, click any white or grey area in the photo (I used the white Intel patch in this example). You'll immediately see the change in the image. For added creativity, you can impart a warmer or cooler look to your image by experimenting with the White Balance--do this by playing around with the Temperature slider. Finally, you can crop or straighten the image by clicking the relevant tool icons above the image window. capture_05112008_235437


capture_05112008_235455
7. Optional step: Camera RAW provides a quick method to apply one or more settings from the selected image to several other RAW images. This is a great way to assign similar processing settings to a sequence of images shot in the same environment, for example. Start by clicking the image you want to copy parameters from. Then press the CTRL key and click other images to which you want to copy the settings. Click the Synchronize... button above the thumbnail strip on the left. You'll see a box that lets you checkmark several parameters for copying to the selected images. Click Ok, and all the chosen settings get applied to your selected images--a great time-saving feature! capture_06112008_002017
8. After making changes to all your RAW images, click Done from the main Camera RAW interface. You are now ready to process these images--on to the next section.  


The final stage is processing these RAW images and creating JPEG or TIFF files that you can e-mail or print. Here's how you do it:

1. Start Adobe Bridge by clicking its icon next to the Brushes Palette. capture_05112008_235537
2. Using the drop-down under the menu bar, select the drive, then browse to the location on your hard disk where your processed RAW images are stored. Select all the RAW images (click on any one in the interface and hit CTRL+A) capture_05112008_235646
3. Click the Tools menu item, select Photoshop, then click Image Processor... capture_05112008_235715
4. You'll now see a box from which you can configure several output options for your images. This adjoining screenshot shows the settings I use--these create high-quality full resolution JPEG files with embedded color profiles. When you're ready to create the output images, click Run. capture_05112008_235752

Now sit back as Photoshop chugs through the process of applying your previous settings, and converting the RAW images into useable output images. Being highly processor intensive, you might have to wait a bit depending on the number of images and the speed of your computer. But the results are so definitely worth it.

Update: I've now switched over to Adobe Photoshop Lightroom 2.1 for my RAW image processing. Click here to learn more about Lightroom 2.1 and my image processing workflow.

Friday, October 10, 2008

Hyperfocus: Everything's clear now

TheGrove_Hyperfocus There's this interesting (and pretty cool-sounding) concept in photography called Hyperfocus. Hyperfocus is a physical property of a given lens which, when fixed at a certain focal point and set at a certain aperture, makes everything from half that distance to infinity appear in sharp focus! Too much to digest? Let's throw in some numbers to make it clearer. If I'm using a 50mm lens and I set the aperture to f/22, when I focus the lens to a distance of 20 feet, everything in the scene from 9'6" all the way to infinity will be in sharp focus. Sounds interesting? If you're a landscape photographer, it sure should.

Let's dig a little deeper. Lenses are strange and wonderful things--there so much of physics involved in them that its easy to get lost in those numbers if you look beneath the surface. Hyperfocus is one such concept that is deeply rooted in mathematics, and there's plenty of information out there if you're interested in digging deeper. But what's more practical are the actual settings for your camera and lens combination that result in a hyperfocal photo. Theoretically, you can set virtually any camera to hyperfocus--even your point-and-shoot digicam. All you need to know are the focal length, f-number, and the circle of confusion for your particular camera/lens combination. The first two parameters are straightforward, but what's this 'circle of confusion'? Basically, it's the smallest clear optical spot that a lens can make. So if you have a magnifying glass and you're focusing sunlight on a hapless crawling creature, the smallest spot you create (measured in mm) is the circle of confusion of that particular lens. In a digital camera, this spot is influenced by the lens and its optical characteristics. If you're interested in calculating the hyperfocal distance of your camera, use this equation here. But wait, there's a quicker way--generate a pre-defined chart of hyperfocus settings for your particular camera! The good folks at the dofmaster Web site have done all of the mathematical heavy lifting, and you can now create a custom hyperfocus chart for your camera model here. Simple.

Cameras don't have just one hyperfocal distance--this distance changes depending on the specific f-stop and lens focal length combination. This lets you select the best combination for your particular use. For example, the technique I find most convenient for hyperfocussing my D40 and its stock 18-55mm lens is:

  1. Set the zoom to 18mm.
  2. Set the aperture to f/16.
  3. Manually set the focus to 4 feet (I do this by holding my camera to my chest and auto-focusing on my shoes--I memorized the 4-foot mark. Then I set the lens to manual focus using the A/M switch.)
  4. Point the camera at the scenery and shoot!

I used the chart referenced earlier to figure out this set of hyperfocus settings. At these settings, everything from 1'10" in front of my camera to infinity is in sharp focus. Click the photo at that opening of this story to see what hyperfocus looks like. It's especially apparent when you have plenty of objects in the near and far field--all in sharp focus.

Friday, October 3, 2008

BIG panoramas!

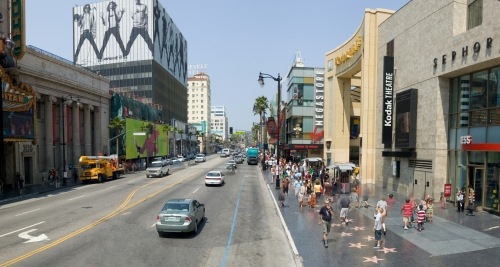
Hollywood BlvdVery often we come across a breathtaking expanse of scenery that just begs to be captured for posterity. A sunset at the beach, a gaping valley during a hike in the hills or even a city view from the 20th floor can lend itself to a stunning panorama photo. Unfortunately, not all cameras are equipped to do justice to such photo ops. Once again, digital tools come to the rescue to help you grab that vista with even the humblest of digital cameras. The solution is to 'stitch' multiple images together into one king-size photograph. The photograph above is of Hollywood Boulevard, taken with a Nikon D40 DSLR using the technique described below.

During my Canon PowerShot A60 days, I used a bundled application that enabled me to capture several overlapping photos of a scene, and stitch them together into one composite photograph. But this software (like most other similar bundled panorama applications) was not very reliable, and I often ended up with badly distorted pictures. Then I discovered a fantastic imaging utility created by a Canadian student as part of his PhD project -- it's called AutoStitch. The amazing thing about this tool is its reliability, and predictably fantastic results. After downloading this tool, all you need to do is configure a few settings regarding the size of your final stitched photograph and the JPEG compression quality. Then you simply point the tool to your source images and voilà, a perfectly stitched panorama! Here's how you do it:

Shooting the source pictures:

  1. If your camera has a manual mode, it's best to  use it so that all of the images will have the same exposure and focus settings. Point your camera at a neutral area in your scenery (not too dark or bright), and note the shutter speed, aperture, ISO and focus settings. Next, set your camera to the manual mode, and use the settings noted earlier. If your camera has manual focusing, use this to prevent it from re-focusing at each shot. This way, the exposure and focus will remain fixed between your shots--this is important during the stitching process later on, and will result in higher quality. The next step is to shoot the source images.
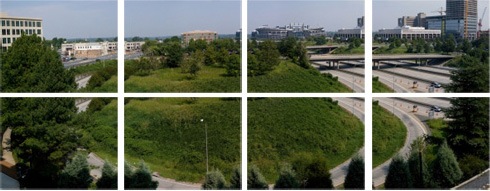
  2. The trick is to shoot multiple images of your scenery in the form of overlapping tiles. You can start at the top left of the scene, and move up-down, then left-right. If it's a simple horizontal pan, you can simply proceed from left to right (or vice versa), or Michael's house_pan if  it's a vertical pan, shoot top to bottom. AutoStitch does not mandate any specific sequence for shooting the images, but it is very important that the borders of each image overlap with the adjacent one by at least 20 percent. If the images do not overlap, it will result in errors and 'tears' in the final stitched image.
  3. This application works best when all the source images are aligned, so remember to hold your camera horizontally (or vertically) while shooting the images--tilts between shots could cause distortion in the final photo.
  4. A good way to visually 'mark' this sequence of panorama shots as separate from your other photos in your camera is to precede and follow this sequence with a blank shot (by covering the camera's lens and shooting, for example). This will make it easier to identify the source image sequence after copying them to your computer.
  5. Preferably put all the source images for each panorama in its separate folder--they will be easier to process in the next step. Remember to delete the blank shots.

The next part is easy--stitching the images using AutoStitch:

  1. You will first you need to set up a few AutoStitch options. Click Edit, then AutoStitch - SettingsOptions.
  2. Don't be daunted by the screen that comes up--most of it contains geeky processing parameters that you can safely ignore. The important settings are the Output Size in the top-left corner and the Other Options in the bottom-right corner. Click the adjoining screenshot for a larger view.
  3. In the first, set the output size to what you want--1600 pixels wide is a good place to start. In the Other Options, select the System Memory setting that best matches how much RAM your computer has, and select the JPEG Quality to 100. Both these settings will affect the processing time for your panorama.
  4. Next, make sure the Auto Crop and Auto Straighten boxes are checked and click OK.
  5. Finally, click File and Open. Navigate to the folder on your hard disk that contains the source images for the panorama. Select the source images, and click Open. Note: Do not select any other images other than the source images, or it would result in an error.

You should now see a progress bar indicating each phase of the image processing as the application crunches through the source images. After it's through, you will find the final panorama in the same folder as the source images.

Check out some examples of panoramas created using this software here. Happy shooting!

Friday, September 26, 2008

My photography gear

I've been passionate about photography for several years now. I admit -- I wasn't that into the field during its film days (not like that was too long ago!), but I really got into it during its crossover into the digital realm.

As the former editor of a popular computer magazine in India, I've had the opportunity to work with numerous digital cameras over the years. I've owned several digital cameras during the time -- the Canon PowerShot A60, the Fuji FinePix S5500, and more recently the Nikon D40 (this is my second one -- the first was stolen. T'was indeed a sad, sad day in my life).

Nikon D40The best entry-level DSLR. Period.
I've been extremely satisfied with the D40 kit, and would dare say that it's the most brilliant piece of photography equipment in its class. It is compact, delivers excellent imaging performance, and is extensible. Right now, I really don't see any reason to upgrade to a camera beyond 6 megapixels (if I need to print photos, I can comfortably do so at A4 sizes at excellent detail levels). Given that this is an SLR -- and a happily compact one at that -- it blends in so well during my photography jaunts. I think the size of a camera has a fairly significant bearing on a photographer's ability to blend in. Walk up to someone while holding a huge camera and lens, and you're sure to get a dose of 'camera coyness', effectively destroying any opportunity for that desirably natural shot! Coming back to the D40 -- it embodies a blend of great usability characteristics and feature benefits. And it's got the lineage and DNA of great SLR performance.

It's all in the glass
I'm firmly believe that a camera is 90 percent about its lens. The rest follows. So when people ask me how many megapixels they should look for in a camera, or how much zoom it should have, I advise them to consider the following specifications: quality of the lens, sensor rating (size and megapixels--the more the merrier), form factor, creative functionality, battery life, and extensibility. Of course, the importance of these specifications decreases with your seriousness towards photography -- if it's a point and shoot pocket device you're looking for, where convenience overrides everything else, most cameras in this class are closely matched on image quality and functionality. The differences are more noticeable when you're looking for good imaging performance.
That said, the stock 18-55mm f/3.5-5.6 AF-S lens that's bundled with the D40 is a pretty good performer, given the overall price bundle. But I was looking for a bit more telephoto performance, and a good portrait lens. Without breaking the bank, of course.
I found the answers in a Sigma 18-200mm f/3.5-6.3 DC OS HSM lens, and a Nikkor 50mm f/1.8D prime. 

Sigma 18-200mm f/3.5-6.3 DC OS HSM After much research (and diligently poring over imaging charts, sample photos, spec listings and price comparisons), I decided this Sigma 18-200mm was the lens I was looking for to serve my everyday shooting needs. It is versatile, capable, relatively compact, and offers pretty decent performance. Sure, it isn't best-of-class in any of these, but when it comes to lenses, it's difficult to get everything in a single package! The 18-200mm zoom offers pretty good wide angle and telephoto performance, the integrated motor plays well with the D40's requirement for AF-S auto focusing, and it has optical stabilization resulting in lesser motion blur in low light and telephoto shots. Spec for spec, I found this better than a similar Tamron lens. Of course, the Nikon 18-200mm f/3.5-5.6G IF-ED AF-S VR DX is the best you can get in this class, but it's also priced 45 percent higher than the Sigma 18-200mm! *Sigh*

Nikkor 50mm f/1.8DThe Nikkor 50mm f/1.8D is a very interesting lens. It's a fantastic piece of imaging glass, boasts excellent clarity, and delivers delicious depth of field. Add to that, it's small and very light (not the kind that will intimidate your subjects!). It gets better--it's priced at under Rs 6,000! Too good to be true? Well there is one small downside -- this lens is not the AF-S kind, and therefore lacks the integrated autofocus motor. So, while the lens can autofocus when used with cameras that have a built-in focusing motor, the lens cannot autofocus with cameras like the Nikon D40. But I decided its pros far outweighed the cons. Plus, using the manual focus is easy after a bit of practice. Besides, manual focus builds character and puts hair on your chest! With the D40's 'green dot' focus indicator in the viewfinder, it doesn't take too long to get used to. At the end of the day, the results are well worth it. Check out some of photos with these lenses in my Flickr photostream.

RAW versus JPEG
I always shoot in RAW format, and I always process the images individually using Adobe Camera RAW. The world around us varies so much in lighting and environment, that it's necessary to work on photos to extract the best from them. People often argue that the best photos are the ones that aren't 'touched up'. I disagree. Digital photography now allows us to extend the capabilities of the hardware in ways that were never possible back in the film days. And it's faster and more convenient. So why not use the technology to the hilt? RAW processing has enabled me to take some pretty satisfying photos, and it's easy when you have a good workflow going. If you want to venture into the world of RAW photography, check out this excellent tutorial on shooting in RAW from one of the foremost in the field. Of course, if you couldn't be bothered with the added overhead of RAW image processing, you could always set your camera to shoot in JPEG. But that's less than ideal. And once you begin to experience the inherent superiority of a RAW-processed image, you'll never go back to JPEG -- I guarantee it.

I could go on, but let's leave some for another post! Leave a comment if you need more information on any of the hardware, techniques, or concepts I've touched upon here. Cheers!

Related Posts with Thumbnails