Showing posts with label camera. Show all posts

Thursday, June 3, 2010

Four steps: From point-and-shoot to pro!

Being a good photographer is more than just having the best equipment or getting plenty of practice. To be able to truly ‘tell a story’ through imagery, there are certain rules of thumb I’ve come to learn—rules that can almost instantly notch up photography skills. Here, then, is a quick list of points to bear in mind each time you’re poised to click that shutter button, and a few associated techniques I use that can help nail that shot.

Focus: Even the best software and most advanced computer cannot save a photograph that’s out of focus. Unless you intentionally want blur in your photograph, you absolutely and positively need to ensure that the key subject in your shot is in focus.
viewfinder Technique: Master the art of pre-focusing the camera before shooting. Pre-focusing or focus lock is a mode that almost every digital camera has—it’s what enables you to half-press the shutter button (during which time the camera focuses, calculates exposure, and blazes through all the processing required to take that shot). The actual photo is captured only when you completely press the shutter release button and you hear the ‘click’. So, yes, get used to pre-focusing.
Next, Look through your camera’s viewfinder and you’re likely to see a pattern similar to the one shown above. This pattern helps you determine how the camera focuses. In this case, the five double-bracket boxes indicate the five focusing zones the camera uses to determine which part of the scene to focus on. The box in the center of the viewfinder is your best friend—set your camera to ‘Center Focus’, the mode that only considers that center reticle as the focus point. Then point the camera so that the center point is on the subject, half-click, then reposition the view to frame as required before completely clicking. This technique will ensure your key subjects are always in focus—no more blurry person in the foreground and sharply focused (but boring) trees in the background.

Composition: Composition is the process of framing your scene, so that there’s a balance The historic Pigeon Point lighthouse on Highway 1among all of the elements. When looking at a scene through your camera, think of the scene as being divided into imaginary thirds, both horizontally and vertically (see the lighthouse example here). As a rule of thumb, aligning the key elements in your scene with these ‘third’ positions is proven to lend balance to photographs. Sure this is subjective, but view online examples using the ‘rule of thirds’ and you’ll see what I mean.
Technique: The trick is to frame your scene so that the key elements get the most ‘visual weightage’ and the lesser elements are eliminated. Feel free to also use the zoom, or move and change your perspective until you find the right frame. Hint: Use the focus lock technique described earlier right before you frame. That way you can focus on your key subject, then move it to a different part of the frame for creative composition before clicking to capture the photo. Even after you’ve shot the photo, feel free to crop your image to eliminate unnecessary elements (for example, random people at the edge of the photo, or an intrusive tree branch spoiling an otherwise good portrait).

Exposure: Exposure is actually a pretty complex part of photography, and one that is integral to the art. It is the process of determining the correct shutter speed, aperture and film speed, which determines how much light is captured by the camera. Fortunately, today’s digital cameras do all of the hard work for us, and compute these values in a blink of an eye during the time it takes to press the shutter button! Correct exposure means that the key element of interest in the photo (be it a model, car, landscape or pet) looks naturally lit—not to dark or too bright.
Exposure Technique: As a rule of thumb, if your key subject looks badly lit (too dark or too bright), point the camera so the subject is in the center of the frame, then focus lock (yeah, focus lock again—it’s that invaluable!), then reposition to frame the scene as you desire before clicking. If you’re so inclined (and if your camera supports it), play around with the shutter speed or aperture to make your camera take in less or more light from the scene (higher shutter speed or higher aperture number=lesser light into the camera, and vice versa). Take heart—minor mistakes in exposure can be fixed using software like Adobe Photoshop or Lightroom, or even photo managers like Picasa.

Subject: Finally, a good photo also depends on how good the subject is, so keep your Shastaeyes peeled for great photo opportunities. Good photo ops needn’t be posed; even the most mundane of scenes—the rapture of a dog playing in the street, or the thematic contrast of an old man standing beside a little child—are great photo ops.

Technique: The trick is to get sensitized to noticing these opportunities—very often the real photo is not immediately apparent. You need to move around, sometimes change your point of view to notice a potentially great shot. Even for posed photos, try to set up the scene to bring the best out of your subject. Make them smile, grant importance to key attributes in their personality, or try to reposition them so they’re in soft lighting where possible (maybe shoot in the natural light of dawn or dusk).

At the end of the day, the secret lies in technique. You don’t need to master every mode of your camera to be able to take photos that tell a story, but bringing the elements above together will lift your photography from amateur to a definitive prosumer. Beyond these basics, there are several methods available that can lift your photography even higher—image processing, HDR etc. But that’s another story. Best of all, digital photography is forgiving when it comes to practicing: hit the delete button and start over! So go ahead—experiment away.
Friday, December 5, 2008

Adobe Photoshop Lightroom 2: Portrait tricks

Good photos begin with good technique. More than having a capable camera and great equipment, it's all about mastering the nuances of composition, understanding the capabilities of your equipment, and knowing how to capture the situation and subject. But even in the best of cases, it's good to know that you can use tools that'll help you lift the quality of your image just enough to push it into 'exceptional' territory.

The capability of today's digital cameras to resolve the tiniest of details in a scene can actually be detrimental--with their multi-megapixel sensors and high-quality optics, digital SLRs are especially relentless when it comes to capturing the good and the bad in a subject. With portraits, you can capture the colored serrations in your subject's iris as easily as the blemishes on their cheeks or the discoloration in their teeth. So while some schools of thought might deem this to be cheating, I say why not use technology to flatter your subject--be it a beautiful friend, a stunning landscape, or a luscious plate of chocolate cake!

Photoshop Lightroom 2 offers a great set of tools for touching up your photos--you can be as subtle or blatant as you want. Here are some of the tools I use when it comes to portrait photography, so that I can show my subjects in the best possible light (pun intended!).

For portraits:
When it comes to touching up portraits, I use the following tools in Lightroom 2 to make a few subtle changes that can make a stunning difference. Note that I first went through the basic image correction procedures as described in my previous blog post.

capture_05122008_012557

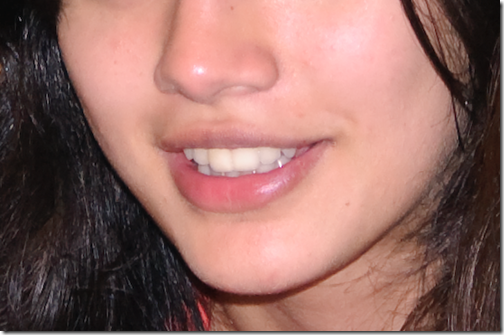
We'll first start by analyzing the photo and determining what needs to be fixed. In the picture above, the subject has great features to start with, but there are a few tiny aspects that can be fixed including blemishes, skin oiliness, and a slight discoloration in the teeth. To add a touch of glamour, we can also impart a bit of 'glow' to the skin. Now that we know what to do, let's dive right in!

1. Spot Removal: Go to the the Develop module and hit the [N] key, or click the Spot Removal icon beneath the histogram. Next, change the size of the reticle by using your mouse scroll wheel (if present), or the box bracket keys '[' or ']'. Make this reticle slightly larger then the skin blemish you want to eliminate. Click-hold on the spot, and drag the mouse to a clear patch of skin. You'll see the clearing effect in real time--leave the mouse button when you're satisfied with the effect. Repeat this process for all spots on your subject's face. The circles in the adjoining photo represent the locations where I used spot removal. Press the 'H' key if you can't see these markers. capture_05122008_012807
2. Skin smoothening: This is perhaps one of the most powerful effects you can use for portraits. In Lightroom 2, you can use the Clarity component of the Adjustment Brush in the Develop module. Press the 'K' key to access this tool, then enable the 'Show Effect Sliders' toggle switch. Click the Effect drop-down menu and select Clarity. Now drag the Clarity slider down to about -70, and set the Flow slider to 40. Remember: the lower the Clarity slider, the greater is the effect of the skin smoothening. Flow controls the intensity of the strokes while using the tool. Remember that you can also vary the Clarity later, because it is basically a layer mask whose intensity can be changed--all thanks to the fact that effects in Lightroom 2 are non-destructive.
To use the Clarity tool, click once on the image to enable the tool, then select an appropriate brush size (as described in point 1), and 'paint' across the skin areas only. Avoid using this tool on the eyes, mouth and other facial areas that have detail, because you don't want these areas getting blurred.
capture_05122008_013514
Hold the mouse pointer over the marker to see the areas you've affected (indicated in red). To erase the effect over a particular area, press the [ALT] key and paint those areas. Use this method to bring back clarity into areas you might have mistakenly smoothened. capture_05122008_014806
3. Dental magic: Give your subject a Julia Roberts smile in a jiffy! Once again, we use the Adjustment Brush, but this time we select Saturation from the Effects drop-down list. Drag the Saturation slider down to -100, and select a nice white color from the color patch. Also, check Auto Mask.
To use the tool, click once anywhere on the teeth area to enable the tool, then select an appropriate brush size (as described in point 1), and 'paint' across the teeth areas. After you've finished, hold the mouse pointer over the marker to see the areas you've affected (indicated in red). Use the technique described above to subtract this effect if you need to.
The teeth should now look visibly brighter. Be careful not to overdo this effect--vary the flow and make sure to leave a hint of color in the teeth. Overly white teeth can look unnatural and eerie!
capture_05122008_015641
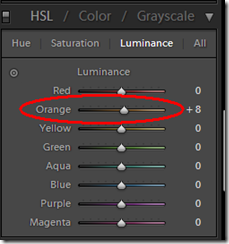
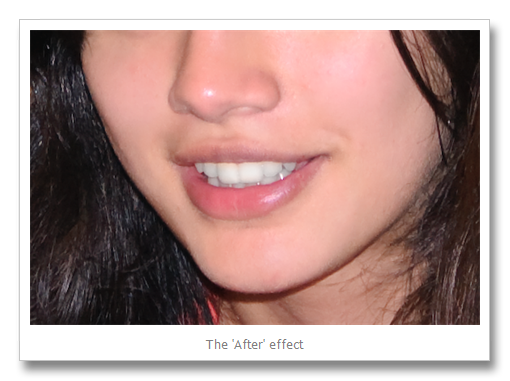
Glowing complexion: Here's a cool trick to add a hint of glow (and glamour!) to the skin. Scroll down the Develop module panel until you reach the HSL / Color / Greyscale section. Click on Luminance, and increase the Orange component to about +8. You'll see a subtle, yet visible difference!
Once again, resist overdoing it or your subject's skin just might begin to look fluorescent!
capture_05122008_020646

That's it! You should now have a much more glamorous subject. The only downside with these tweaks is the number of people who'll hound you to take their pictures, because 'your camera makes them look good'. If only they knew.

Friday, October 10, 2008

Hyperfocus: Everything's clear now

TheGrove_Hyperfocus There's this interesting (and pretty cool-sounding) concept in photography called Hyperfocus. Hyperfocus is a physical property of a given lens which, when fixed at a certain focal point and set at a certain aperture, makes everything from half that distance to infinity appear in sharp focus! Too much to digest? Let's throw in some numbers to make it clearer. If I'm using a 50mm lens and I set the aperture to f/22, when I focus the lens to a distance of 20 feet, everything in the scene from 9'6" all the way to infinity will be in sharp focus. Sounds interesting? If you're a landscape photographer, it sure should.

Let's dig a little deeper. Lenses are strange and wonderful things--there so much of physics involved in them that its easy to get lost in those numbers if you look beneath the surface. Hyperfocus is one such concept that is deeply rooted in mathematics, and there's plenty of information out there if you're interested in digging deeper. But what's more practical are the actual settings for your camera and lens combination that result in a hyperfocal photo. Theoretically, you can set virtually any camera to hyperfocus--even your point-and-shoot digicam. All you need to know are the focal length, f-number, and the circle of confusion for your particular camera/lens combination. The first two parameters are straightforward, but what's this 'circle of confusion'? Basically, it's the smallest clear optical spot that a lens can make. So if you have a magnifying glass and you're focusing sunlight on a hapless crawling creature, the smallest spot you create (measured in mm) is the circle of confusion of that particular lens. In a digital camera, this spot is influenced by the lens and its optical characteristics. If you're interested in calculating the hyperfocal distance of your camera, use this equation here. But wait, there's a quicker way--generate a pre-defined chart of hyperfocus settings for your particular camera! The good folks at the dofmaster Web site have done all of the mathematical heavy lifting, and you can now create a custom hyperfocus chart for your camera model here. Simple.

Cameras don't have just one hyperfocal distance--this distance changes depending on the specific f-stop and lens focal length combination. This lets you select the best combination for your particular use. For example, the technique I find most convenient for hyperfocussing my D40 and its stock 18-55mm lens is:

  1. Set the zoom to 18mm.
  2. Set the aperture to f/16.
  3. Manually set the focus to 4 feet (I do this by holding my camera to my chest and auto-focusing on my shoes--I memorized the 4-foot mark. Then I set the lens to manual focus using the A/M switch.)
  4. Point the camera at the scenery and shoot!

I used the chart referenced earlier to figure out this set of hyperfocus settings. At these settings, everything from 1'10" in front of my camera to infinity is in sharp focus. Click the photo at that opening of this story to see what hyperfocus looks like. It's especially apparent when you have plenty of objects in the near and far field--all in sharp focus.

Friday, September 26, 2008

My photography gear

I've been passionate about photography for several years now. I admit -- I wasn't that into the field during its film days (not like that was too long ago!), but I really got into it during its crossover into the digital realm.

As the former editor of a popular computer magazine in India, I've had the opportunity to work with numerous digital cameras over the years. I've owned several digital cameras during the time -- the Canon PowerShot A60, the Fuji FinePix S5500, and more recently the Nikon D40 (this is my second one -- the first was stolen. T'was indeed a sad, sad day in my life).

Nikon D40The best entry-level DSLR. Period.
I've been extremely satisfied with the D40 kit, and would dare say that it's the most brilliant piece of photography equipment in its class. It is compact, delivers excellent imaging performance, and is extensible. Right now, I really don't see any reason to upgrade to a camera beyond 6 megapixels (if I need to print photos, I can comfortably do so at A4 sizes at excellent detail levels). Given that this is an SLR -- and a happily compact one at that -- it blends in so well during my photography jaunts. I think the size of a camera has a fairly significant bearing on a photographer's ability to blend in. Walk up to someone while holding a huge camera and lens, and you're sure to get a dose of 'camera coyness', effectively destroying any opportunity for that desirably natural shot! Coming back to the D40 -- it embodies a blend of great usability characteristics and feature benefits. And it's got the lineage and DNA of great SLR performance.

It's all in the glass
I'm firmly believe that a camera is 90 percent about its lens. The rest follows. So when people ask me how many megapixels they should look for in a camera, or how much zoom it should have, I advise them to consider the following specifications: quality of the lens, sensor rating (size and megapixels--the more the merrier), form factor, creative functionality, battery life, and extensibility. Of course, the importance of these specifications decreases with your seriousness towards photography -- if it's a point and shoot pocket device you're looking for, where convenience overrides everything else, most cameras in this class are closely matched on image quality and functionality. The differences are more noticeable when you're looking for good imaging performance.
That said, the stock 18-55mm f/3.5-5.6 AF-S lens that's bundled with the D40 is a pretty good performer, given the overall price bundle. But I was looking for a bit more telephoto performance, and a good portrait lens. Without breaking the bank, of course.
I found the answers in a Sigma 18-200mm f/3.5-6.3 DC OS HSM lens, and a Nikkor 50mm f/1.8D prime. 

Sigma 18-200mm f/3.5-6.3 DC OS HSM After much research (and diligently poring over imaging charts, sample photos, spec listings and price comparisons), I decided this Sigma 18-200mm was the lens I was looking for to serve my everyday shooting needs. It is versatile, capable, relatively compact, and offers pretty decent performance. Sure, it isn't best-of-class in any of these, but when it comes to lenses, it's difficult to get everything in a single package! The 18-200mm zoom offers pretty good wide angle and telephoto performance, the integrated motor plays well with the D40's requirement for AF-S auto focusing, and it has optical stabilization resulting in lesser motion blur in low light and telephoto shots. Spec for spec, I found this better than a similar Tamron lens. Of course, the Nikon 18-200mm f/3.5-5.6G IF-ED AF-S VR DX is the best you can get in this class, but it's also priced 45 percent higher than the Sigma 18-200mm! *Sigh*

Nikkor 50mm f/1.8DThe Nikkor 50mm f/1.8D is a very interesting lens. It's a fantastic piece of imaging glass, boasts excellent clarity, and delivers delicious depth of field. Add to that, it's small and very light (not the kind that will intimidate your subjects!). It gets better--it's priced at under Rs 6,000! Too good to be true? Well there is one small downside -- this lens is not the AF-S kind, and therefore lacks the integrated autofocus motor. So, while the lens can autofocus when used with cameras that have a built-in focusing motor, the lens cannot autofocus with cameras like the Nikon D40. But I decided its pros far outweighed the cons. Plus, using the manual focus is easy after a bit of practice. Besides, manual focus builds character and puts hair on your chest! With the D40's 'green dot' focus indicator in the viewfinder, it doesn't take too long to get used to. At the end of the day, the results are well worth it. Check out some of photos with these lenses in my Flickr photostream.

RAW versus JPEG
I always shoot in RAW format, and I always process the images individually using Adobe Camera RAW. The world around us varies so much in lighting and environment, that it's necessary to work on photos to extract the best from them. People often argue that the best photos are the ones that aren't 'touched up'. I disagree. Digital photography now allows us to extend the capabilities of the hardware in ways that were never possible back in the film days. And it's faster and more convenient. So why not use the technology to the hilt? RAW processing has enabled me to take some pretty satisfying photos, and it's easy when you have a good workflow going. If you want to venture into the world of RAW photography, check out this excellent tutorial on shooting in RAW from one of the foremost in the field. Of course, if you couldn't be bothered with the added overhead of RAW image processing, you could always set your camera to shoot in JPEG. But that's less than ideal. And once you begin to experience the inherent superiority of a RAW-processed image, you'll never go back to JPEG -- I guarantee it.

I could go on, but let's leave some for another post! Leave a comment if you need more information on any of the hardware, techniques, or concepts I've touched upon here. Cheers!

Related Posts with Thumbnails