Showing posts with label web site. Show all posts

Friday, March 13, 2009

Automating your Web browser

These days, finding ways to be more productive and efficient is key to staying ahead. When it comes to general office work, browsing the Web or working on online forms and Web sites takes up a significant part of our working hours. In the normal course of working on Web sites, you'll notice a large amount of repetition in the tasks you do--logging into your favorite sites, entering registration information into online forms, transferring image and text data between your computer and the Internet... this list goes on. So how does it sound if I told you there's a way to automate these repetitive tasks, so that they can be performed with a single click? For starters, it would save a heck of a lot of time each day, and accrued over days and months it would translate into considerable savings and higher productivity, leaving you with more time for stuff you like doing!

iMacrosI use Firefox as my primary Web browser, and have been using a great little Add-on called iMacros to automate many things I do on the Web. From doing something as simple as logging into my Gmail account, to rebooting by DSL modem at specifics time each day (I'm on an Internet plan that offers unlimited data transfer between midnight and 8am, but I need to restart my modem at these times), I've created macros that have enabled me to free up gobs of time. Here's a brief walk-through for automating your Web browser:

First, download the iMacros Add-on for IE of Firefox from here. After installing it, launch it by clicking on the toolbar button that shows up in your Web browser.
Hint: Click the images for a larger view.
iMacros sidebar
You'll see several demo scripts in the sidebar--double-click one and you'll see it launch into action using demo scenarios. If you're so inclined, you can click on a preset script, then click the Edit Macro button to view the code that drives the script. Reading these lines should give you fair idea about how it works. iMacros sidebar - Edit
If you don't want to be bothered with writing code, you can simply have iMacros record your actions as you click through Web sites and enter information--the relevant code gets created automatically. To record a new macro using this method, click the Rec tab in the sidebar, then click the Record button. Then use your browser as you would while performing a given task--iMacros records your actions such as information typed in, and buttons, tabs and links clicked. Click the Stop button when you're finished. Rename the new macro that appears in the side bar to something indicative of your recorded task. iMacros sidebar - Record
The next time you want to run that task, simple double-click on the macro name, and watch as iMacros launches and does your work for you--in record time!

To help you get up to speed, see the iMacros support page for tutorials and code samples.

Next up, I'll write about how I created a script that reboots by DSL modem at specific times, enabling me to better utilize my unlimited night time download bandwidth.

Thursday, January 8, 2009

Building a Web site using Kompozer

Now that we've gone through the motions of what's required to get started with building a Web site--booking the domain and selecting a hosting provider--we're now on to the final stage of actually building the Web site! This step involves creating the HTML files that contain the site content, and link to other elements like images, downloadable files and whatever else you might want to include on your Web site.

Building a Web site can be creative, or quick-and-dirty. The path you choose depends on:

  1. Your skill with Web designing
  2. Your knowledge of Web programming
  3. Your access to Web design applications
  4. The duration you have to complete the project

Assuming you're like me, you:

  1. Have no formal training in Web programming or design
  2. Have no Web programming skills
  3. Are reasonably skilled with Photoshop and image editing

I know, this doesn't look like too promising a position to start at. But that's the beauty of the Internet coupled with a bit of passion--you can learn pretty much anything, and produce reasonably decent results. In my case, I embarked on my Web site building journey about a month ago while chatting with Anil, a close friend of mine who's spent the majority of his life doing some amazing work rehabilitating destitute, aged, and mentally challenged individuals. Having been doing this for over 20 years and operating on razor thin budgets, we decided that it was about time we put his Institute on the Web and make its work known to the World at large. That's when we decided to build a Web site for the Cardinal Gracias Institute.

After the idea took seed, we were completely stoked at the journey that lay ahead and dived headlong into it. In our five-step plan, we:

  1. Created the site map and identified the site's major sections.
  2. Wrote content for each of these sections and refined it until we were satisfied.
  3. Selected the hosting provider hours of comparing (I finally chose Host Monster).
  4. Went about designing and building each of the Web pages using Kompozer.
  5. Incorporated cool functionality (rollovers, maps and slide shows) by digging up free code snippets from online resources.

I've already covered the first three points in my earlier posts, so here I'll mention briefly about my adventures with Kompozer--an open source Web authoring tool--and touch upon other resources I used to spruce up the Web site's functionality.

If you've heard of applications like Adobe DreamWeaver and Microsoft FrontPage, Kompozer lives lower down the capability scale, but still offers enough functionality to get started with Web design.

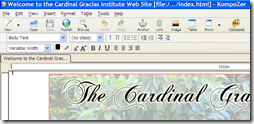
Let's start with the application's interface. At first glance, its toolbar closely resembles a word processor with the usual buttons for adding text, images and tables, and formatting these elements. But instead of creating document files, this application generates HTML files that can be subsequently uploaded to your Web server using the built-in FTP tool. capture_08012009_161454
The large area beneath the toolbar displays your Web page in one of several views: Normal, HTML Tags, Source, and Preview. You can switch between these views by clicking on the tabs at the lower left of the interface.
To learn more about this application, head over here for excellent explanations on its features and functionality.
capture_08012009_162155
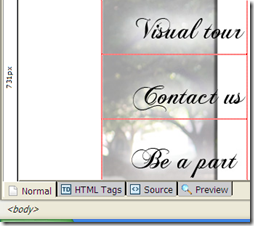
I started building the Web site by first creating 'mock-ups' of how the key pages would look--this included the Home page, and the inner page templates. For the site design, I used a traditional header image on top, the navigation bar on the left, and a vertically scrolling content area.
I took several photos when I visited the institute earlier, which I used extensively in the design. To keep all the images together, I created a table and arranged, merged and added cells to accommodate these images and text blocks on each page. You'll see the boundaries of each of the cells in the adjoining screenshot (click for a larger version).
I designed these pages by studying the method described here. After creating the main home page, I simply created copies of this page and used these as starting points for the inner pages. Doing this ensured consistency.
capture_08012009_163911
I prepared the banner, side bar and the various photos using Photoshop, using basic Photoshop layer effects (outer glow and drop shadows). The swirly font in the main title and the side bar is 'Chopin', and is freely available. For all the images, I used 'Save for Web' (at 80 percent quality), as I found this to be the best blend of image clarity and file size. Remember that all Web elements should be as small as possible to result in the quickest page load performance. capture_08012009_172651
I found a freely available Javascript code to create a rollover effect for the sidebar categories. To create these rollovers, I used two images for each of the category labels--one with the normal text, another with the outer glow effect. The Javascript code simply swaps the highlighted version with the normal version when you hover the mouse over each label. All I did was incorporate this Javascript code into the header section of the HTML pages, and make a few changes to the image references.
I later stumbled upon a supposedly more elegant way to achieve this effect using the CSS method--see here for more details.
capture_08012009_174039
I incorporated a photo slide show in the site using the outrageously simple method of embedding a Picasa slideshow into a Web page.
Using a similar approach, I also embedded a neat Google map pinpointing the location of the Institute on the 'Contact us' page.
capture_08012009_174624

Feel free to head over to the Cardinal Gracias Institute Web site to see how these techniques took to life.

On a separate note, I'd really appreciate if you could spend a few minutes to learn more about the selfless work that Anil and his dedicated team do at the Institute. Feel free to contact him directly if you're keen on knowing more, visiting the institute, or (better still) helping out in cash or kind.

Tuesday, December 30, 2008

Setting up your own Web site: Part two

When it comes to setting up your own Web site, this much is clear--it's easier than you think. It all begins with getting a firm handle on the focus and intent of your Web site, and pulling together compelling content (see my earlier post here). The next step is to shop for online services that will help you book your domain name, and actually host your Web site. Let's see how this works:

Booking the domain name: Quite simply, the domain name is the name of your Web site. The first thing you'll need to do is check whether it is available. To do so, you can head over to one of hundreds of available Domain Registrars--these are authorized services that sell domain names. Some of the more popular ones are Network Solutions, Act Now Domains or Register.com. All you need to do is type in your preferred site name in the search field, and you'll find out whether it taken or not. When you find a name that's available, you choose the duration for which you want to book the domain name (ranging from a couple of months to several years--the longer you book it for the cheaper it works out). All domain registrars accept payment by a secure credit card transaction.
While deciding a domain name, remember to keep it short, simple and easy to remember. Also, you should preferably to choose a '.com' URL instead of '.org' or '.biz', as most people are accustomed to remembering the former.

HostMonster hosting featuresHosting your Web site: You will now need to select your Web site's home! Web hosting providers offer several plans (just like your cell phone operator, for example), that consist of a selection of hosting specifications. Just like a home maker shopping for a house, you'll need to consider these specifications before deciding on where you want to host your Web site. These factors include:

  • How much and what type of content do you plan to host? Depending on what your Web site consists of, you could require a few megabytes to several gigabytes of storage space. Look out for how much hosting space is offered and compare this with your requirements.
  • Do you know how to design and build a Web site, or would you like to work with pre-created templates? If you have Web design and coding skills (knowledge of Microsoft FrontPage or Adobe DreamWeaver, HTML programming, CSS, PHP and the like), you will most likely be designing your Web site on your computer, and then uploading it subsequently. If Web designing is new to you (and  you don't want to be bothered with the nitty-gritties), look for a hosting provider that offers 'Site Design' or 'Site Builder' capabilities. Here, you can access hundreds of pre-created Web site templates, where all you need to do is dump your content into these canned Web sites and you're ready to go. While this approach might limit your customization options, it is the quickest and simplest way to get up and running. Also remember that this convenience might come at a price premium.
  • How much site traffic do you expect? If you're setting up a commercial Web site that you plan to promote heavily, you will most likely have plenty of traffic coming to your Web site. hosting providers offer different 'bandwidths', which is the amount of data transfer they allow to and from your Web site per month. The greater the bandwidth you need, the  more you'll need to pay.
  • What other functionality do you need on your Web site? Many hosting providers offer basic extras like e-mail addresses, blog capabilities, spam filtering and programming language support, you can also select value-added services including SSL support (for securing communication between your Web site and its visitors), VPN access, video and audio streaming support.
  • What kind of support does the hosting provider offer, and how reliable are they? This is an aspect that's easily overlooked--there's nothing more frustrating than your Web site being unavailable when you need it, and not being able to reach its helpdesk quickly. The best way to check this is to actually make random calls to their helpdesk at odd hours, and ask them basic questions such as help on what hosting plan to choose, special offers running etc. The quality and timeliness of their responses will be an indication on your experience with them later on.

Some of the more popular hosting providers include Host Monster, GoDaddy, DreamHost, and Media Temple. Glance through their hosting plans and you will get an idea about the facilities offered. Note that several of these Web sites offer both domain registration and Web hosting services as a package--it's up to you to take these services from the same provider, or from separate ones. At the end of the day, it's about finding the right blend of price, features, reliability and support. Happy hosting!

Wednesday, December 17, 2008

Setting up your own Web site: Part one

Web site visual At first, it sounds like a daunting task in itself. You'd ask, "Isn't this something that only large companies with development and programming teams can do?" Actually, no--these days it's something that anyone can! So if you're thinking of popularizing your home business, or creating a platform for sharing your hobbies, or just setting up a home for your family on the Web, you can build a www.yourname.com Web site easier than you can imagine! All it takes is getting familiar with the process, and understanding some of the jargon you'll encounter along the way. After that, you make like you're strolling through the aisles of your favorite supermarket as you set off shopping for the right online services--it's actually fun! From end to end, you can be up and running within a week. Here's how you go about it:

At this juncture, you should grab a pen and a few sheets of paper and put down a whole lot of questions to which you'll need to eventually get answers.

  • What will be the focus of your Web site? The first and most important part of setting up a Web site is defining a sharp focus for what it will and won't do. Here's where you should decide the purpose of the Web site as sharply as possible: it could be an information repository for your gardening hobby, or an online store for your home catering business, or it could even be a Web presence for your local Golf players club. Once you have a broad set of answers to these questions, you can proceed to the next (and most important!) phase of building any Web site--creating the content.
  • Content, content, content. I can't stress enough how important it is to deliberate, brainstorm, create, and fine-tune the content for your Web site. Before doing anything online, it is all-important to have the content in place first. A good way to go about doing this is by visiting some of your favorite Web sites, and checking out the Site map section. A Site map is a hierarchical listing of the various sections and sub-sections in a Web site, and is the skeleton around which a Web site's content is fleshed out. Start by defining the major 'tier 1' categories of your Web site, then drill down to sub-categories. Each category should have a well-defined focus, and together they should encompass everything your want your Web site to convey. Also, try not to have more than three tiers of categories--a Web site should be designed to facilitate easy and quick access to its information, so your visitors shouldn't have to dig too deep.
    The content creation exercise can be plenty of fun, so involve everyone who's going to be part of the site, so you can get the widest range of ideas and opinions. Ideally, you'll need to progress through several rounds of brainstorming, writing and re-writing before finalizing your content. As a rule of thumb, when creating Web copy keep it simple, concise and to-the-point.
  • What kind of interactivity would you like your Web site to have? A Web site can be as Spartan, or as feature-rich as you'd want it to be. What you eventually decide will be influenced by the answers to questions like:
    • Do you want to include features such as online financial transactions, blogs, user forums, feedback systems, mailboxes and the like?
    • Do you have access to the technical know-how to include these features?
    • Would you want this interactivity at launch time, or can it be incorporated subsequently?

By now, you will have gathered the bulk of the content for your Web site, and you should have a reasonably clear picture of how it is going to pan out--and that's a big milestone! The next step will be exploring online services for registering your Web site's domain name, and finding a Web hosting provider that suits your specific requirements. Look out for my next blog post where I'll provide more details on this latter part of this Web site creation journey.

Update: See my blog posting on choosing a Web hosting provider here.

Related Posts with Thumbnails