Showing posts with label astronomy. Show all posts

Monday, November 3, 2008

Applications that watch the sky

So it's evident I'm on an astronomy trip these days. With the telescope cleaned and ready for action, I fired up the astronomy software I've been using over the past year. This application is actually quite dated (it indicates 2000-2003 on the splash screen!), but serves my needs quite adequately when it comes to figuring out what objects are in the night sky, how to pinpoint their location, and even pull up additional information on them. This software is Starry Night Backyard 4.0.5, and was included with an astronomy book my brother-in-law sent me (he took the subject as part of his credits at Davidson College). The thing is, I've never felt the need to upgrade this software because, well, the university doesn't really change in a hurry. Besides, this application pulls down all relevant satellite, comet, meteorite and asteroid information (the bits of space that do change in a hurry) from the Web and keeps itself up-to-date.

Starry Night BackyardStarry Night Backyard is a fantastic piece of software that delivers everything an amateur astronomer might need to get fired up--it provides a beautiful panoramic view of the night sky from your specific Earthly location, and lets you zoom in, obtain information and locate thousands of celestial bodies including planets, stars, satellites, exotica such as nebulae, galaxies, and deep space Messier and NGC objects. To make things easier, it indicates  wireframes of the popular constellations making them easy to locate, and provides a handy planner that shows celestial objects of interest in the night sky on a given date. Locating an object is simple--simply type the name in the Search box, and the relevant entries show up. Select an entry and the view is re-aligned to center on that object. This little software led me to discovering and viewing such fantastic sights as the rings of Saturn, Jupiter and its satellites, and many other treasures of the night sky--it's one thing reading about these in textbooks, and another thing completely to behold them live, in all their wonder: very evocative of an array of existential questions and musings.

Over the past few days, I've been poking around several astronomy Web sites and checking out some of the newer astronomy applications. Among them, I've found two particularly nice ones:

Stellarium Stellarium v0.10.0: This is an open source application aimed squarely at amateur astronomers (though it's also used to control sky domes in several planetariums around the world). This tool provides a simple, clean-looking interface with all of the features described previously in the Starry Night application. Two control panels at the bottom and left of the screen provide easy access to several tools to control how the sky looks, and lets you change a variety of settings such as your viewing location, time and date, field of view, playback speed and other parameters. Best of all, the night sky it renders is gorgeous--complete with twinkling stars and a realistic milky way. Click on a star or planet and its information is displayed in the upper left corner. Also, there are several keyboard shortcuts you can use to navigate through the application--all in all, a fantastic tool to get you going if you're an astronomy buff looking for a quick, clean stargazing application. Read more about it and download the latest version here.

MS WorldWide Telescope Microsoft WorldWide Telescope: Yes, even I didn't know that Microsoft makes these kinds of applications. This one is apparently from a group called Microsoft Research (hmm, I wonder what the rationale is behind them developing an astronomy application). Anyway, after downloading and using this free software, I actually decided it was a pretty cool astronomy tool. It primarily operates on the same principle as Google Sky--it downloads imagery and information on a particular object or starscape in real time. This is both a positive and a negative point: the speed at which the application renders the display is dependant on your Internet access speed--with the amount of visual data involved, this is a demanding application. However, the quality of these celestial objects is stunning, with the visual details added in as it downloads live data. Another cool thing about this tool is its potential to educate--depending on what you are viewing, it displays several contextual suggestions about nearby celestial objects. This makes it easy to learn about many interesting sights within a particular region. There's also a very informative 'Guided Tours' section that offers several audio/video presentations on constellations, the Hubble telescope, astrophotography and more. Download the latest version of this application here.

So which is the best of these? When it comes to general stargazing, I use Starry Night for its simplicity and speed, Stellarium for its gorgeous display and simple interface, and WorldWide Telescope if I need to get deeper into a particular subject. As they say in the motoring world: your mileage may vary. Either way, all have the potential to rev up any latent interest in astronomy.

Wednesday, October 29, 2008

Readying the telescope

After managing to set aside a couple of hours, I was ready to clean and set up the telescope for some serious stargazing. It's been several months since I last used my Newtonian reflector--the Indian monsoon facilitates stargazing about as much as a hurricane does building a house of cards. Now that the Indian winter is upon us (yes, all 24 degrees of it--Centigrade!), the skies are finally clear with some of the most gorgeous constellations visible.

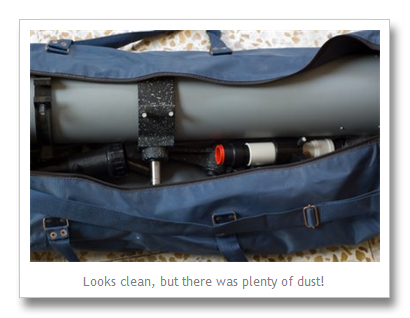
It all had to start with extracting the telescope from that inconveniently unreachable spot under the bed. Shuddering to think of what months of neglect would do to the telescope, I pulled out the large 4-foot bag (after moving several unknown, dusty boxes out of the way), and marveled at the way it was completely overrun with dust bunnies. Clearly, the first order of business was to wipe and wash it down. Without actually unzipping it and having those tufts of dust attack any of the components, I used a bit of elbow grease and got the bag to a relatively decent, presentable state.

Next, I gingerly opened the bag, hoping to discover the insides were spared of the under-bed filth. Fortunately it was, but only just. It beats me how dust finds its way into sealed zippers and plastic bags: the entire telescope assembly was coated with a fine layer of dust, enough to sign my name on.

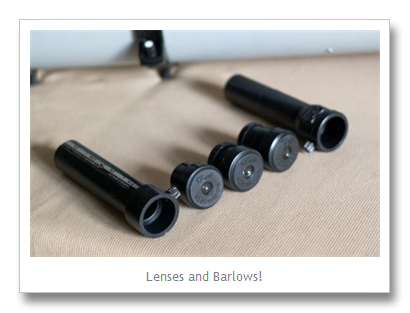
Armed with a damp cloth, I got down to cleaning all the telescope's components and accessories. Here's what I was up against:

From left to right, there's the 1.5x - 3x variable Barlow, the three eyepieces (12mm, 17mm and 25mm), and the fixed 4x Barlow. These eyepieces provide different levels of magnification, and the Barlows are used to increase the effective magnification of the eyepieces when used in conjunction. There was also the 4-foot telescope tube and the wrought iron tripod that needed wiping down.

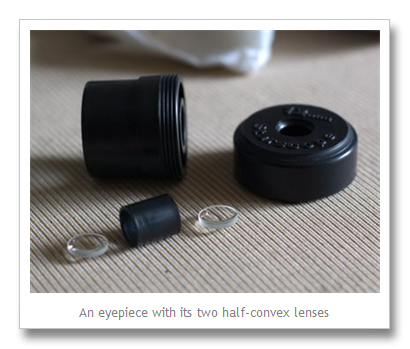
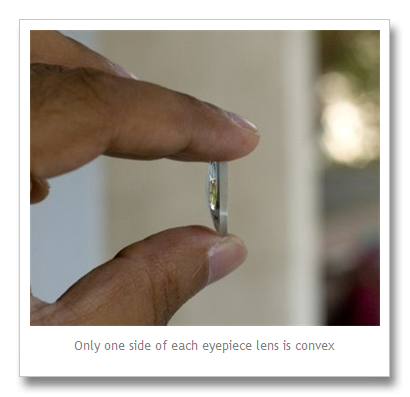
I started out by disassembling each of the eyepieces. Each eyepiece is composed of two half-convex lenses that provide a fixed magnification. Instead of using a single lens, a pair of lenses are used for better image clarity and lower distortion. I cleaned each of these two little lenses with a soft cloth, and re-mounted them with their convex sides facing each other inside the eyepiece.

Here's what a half-convex lens looks like:

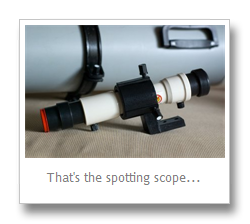
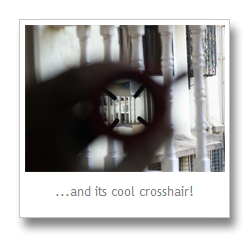
After cleaning all of the eyepieces, I focused on the spotting scope. The field of view in an astronomical telescope can be really small--especially at higher magnifications--making it painful to hunt around the sky while searching for Saturn or Andromeda. That's where the spotting scope comes in. This is a mini-telescope that is mounted on the main telescope. It helps find those elusive planets and stars in a crowded sky. There's a cool-looking cross hair in the telescope that enables you to pinpoint a celestial object, making it easier to view through the main telescope.

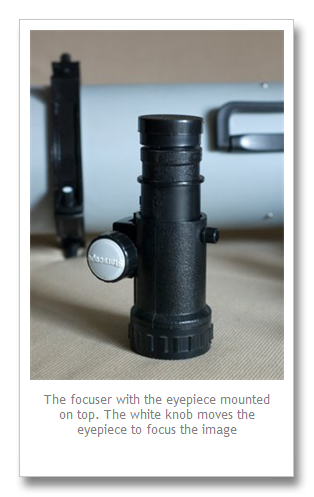
Next up was the focuser--this is a rack and pinion assembly that enables you to mount an eyepiece and move it back and forth to focus on a celestial object. You can change eyepieces depending on the magnification you need--a little thumbscrew holds them in place a the top of the unit.

Here's what the focuser looks like:

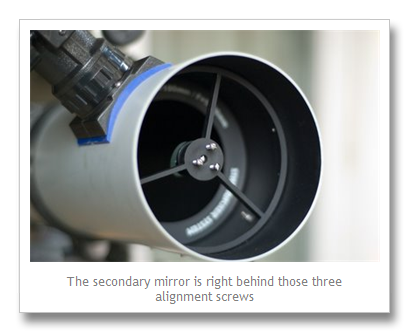
The secondary mirror was easier to clean because it's accessible from the open end of the tube and is small. I jiggered its alignment in the process, but I'd fix that later on during the collimation process.

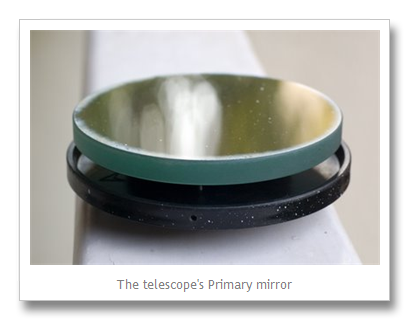
Finally, the primary mirror--the most important component in a reflector telescope. I removed it by unscrewing three screws and extracting it along with its base. After all those years, it showed signs of age with tiny pitting and visible dust grains.

The best advise for cleaning any of the mirrors in a telescope is--DON'T! These mirrors are precision ground, and the reflective coating is on the outside (unlike ordinary household mirrors), making it easy to introduce nicks and scratches if touched. And if this happens, it can severely degrade viewing quality. I decided that the lens was not dirty enough to affect image quality, so I stayed off it.

Note: If you're thinking of cleaning your telescope's lenses or mirrors, see here for interesting techniques on how you can do so effectively and safely.

I was now finally ready to put these components together and get the telescope on its feet. This is how it all looked at the end of the two-hour cleaning and servicing spree:

After all the disassembly and re-assembly, the mirrors in the telescope were outrageously misaligned! So I collimated the telescope using the excellent (though involving) method described in this article from Sky and Telescope. You'll also find an excellent tutorial on collimation in this video here.

Now all I have to do is wait for the skies to clear up after the brief buildup of smog due to the Diwali firecrackers. Then, Orion--here I come!

Note: You'll find more details about my telescope's specifications in my previous blog entry.

Monday, October 27, 2008

Bring out the Newtonian Reflector!

Telescope My fascination for photography stems from a more deeply rooted passion for all things optical. I've always loved lenses and mirrors, and the funky things they do to light. Back in school, physics was never a subject--it was a thrill. A large part of this was due to my being introduced to this subject outside of the classroom. I inherited my dad's fascination with the subject, and he introduced me to the practical world of science at about the same time that Atari was on every kid's wish list. I was presented with my first telescope and hobby microscope kit way back when I was in 4th grade. I was, indeed, blessed. Over the years that I owned those two devices, I viewed everything from ants, spiders, fleas, leaves, and algae to planets, birds, wildlife and everything in between--I more than adequately covered the near and far field. School summers were spent poring over that little microscope and changing lenses for different magnifications, or carrying my refractor telescope while tagging along with dad as he went on his fishing trips at Bandra's Bandstand, a great spot for spin fishing not far from where we lived. Those were the days...

Flash forward about 20 years and I'm still a nut for optics (my shamelessly sycophantic rants on photography are testament enough). A couple of years ago, we (the wife and I) decided to invest in a decent telescope--after all, it's an educational, fun, and geeky device, and will be a super tool to educate young minds down the line, right? And for the time being, the kid in me was ecstatic! I bought this telescope from a company that manufactures them here in Bombay--Galileo Telescope. While shopping for the telescope, I needed to brush up on my fundamentals, and had to revisit several resources for telescope types, magnification powers, resolutions and other terms that were now muddy after all those years. While getting up to speed, I found a super resource in the Sky-Watcher Web site, which elegantly explains the intricacies of understanding and buying a telescope (be it for terrestrial or astronomical use). After several days of collating specifications and understanding fundamentals, I singled out a 4-inch Newtonian Reflector scope. At 4-feet and 6 kilograms, it was significantly larger than the school-time telescope I used, and it looked gorgeous. With its tube measuring a tad under a meter, mounted on a solid, metallic tripod, it adequately fired my passion for stargazing. I was hooked all over again.

Tycho Crater | Moon So what's it capable of? Well, it magnifies from 40x to 333x (though I don't generally use it at the upper end of its magnification), and enables viewing a 12 magnitude star (this refers to the apparent magnitude of celestial body--the higher the number, the fainter the dot in the sky). You'll find a full list of its technical specifications here.

This telescope offers reasonably good light gathering capabilities, and a nice set of accessories for observing different celestial bodies. The rings of Saturn, and the ray system around the Tycho crater on the moon (shown here) are sights to behold! Suffice to say that this telescope embodies pretty serious stargazing firepower.

It's been about two years that I've had this telescope, and it's been fantastic. Which brings me to why I'm ranting about it--it's finally time to bring it out of cold storage again! With the Indian monsoon being anything but ideal for stargazing, the Indian winter is great for it. The skies are clear, some of the best constellations are visible at this time of year, and it's comfortable weather--all conducive to plenty of astronomical action. It happens to be the festival of Diwali in the next couple of days, and I'll finally get time to unpack the telescope, clean and collimate the optical system before enjoying the months of stargazing ahead. More on this experience over the next couple of days.

Update: Talking about lenses and scopes, I came across this awesome new-age kid's microscope--the EyeClops BioniCam. Oh, to be young again.

Another update: Here's the telescope cleaning saga.

Related Posts with Thumbnails