We've already seen the advantages of shooting RAW images here. Next, you'll need to quickly get used to chalking out extra time for processing these images. Depending on how shutter happy you are and how fast your computer is, this could easily run into a lot of extra time--a few hours even. The best way to quicken this process is to get into a groove with processing those images and develop a workflow that lets you crunch through them as efficiently as possible.
First, get to know your RAW processing software. Like any good artist, you need to have a keen understanding of your tools. No matter which RAW processing application you use, read the manual and learn it through and through. The faster you learn the lay of the land, the faster will you be able to navigate it, leaving more time for you to concentrate on tweaking your photos.
 I use Adobe Camera RAW 3.7 (with Photoshop CS2). Camera RAW is a simple, fast and capable plug-in that facilitates RAW processing within Adobe Photoshop. It enables you to access all key areas of the RAW image, including exposure, shadows, white balance, sharpness, saturation and more. You can also crop, straighten and change the white balance in your images. Best of all, these changes are non-destructive--all modifications can be recorded in a separate XML file, so your original RAW images are safe. What follows is a run-through of the process I use while working with RAW images. This is a long post, so brace yourself!
Tip: Click on the images for the full-sized screenshots.
| 1. After copying the RAW images to your computer, select about 20 images, and drag-and-drop them into Photoshop. This automatically opens them in Camera RAW. You will see the series of images in the vertical pane on the left of the interface. |  |
2. I usually dial in a set of fixed values for Saturation, Sharpness and Luminance Smoothing for all my RAW images. These settings work best with my particular camera--you'll need to experiment and find the best settings for yours. The three image parameters I edit are:
Saturation: 10
Sharpness: 40
Luminance Smoothing: 30
You'll find Sharpness and Luminance Smoothing under the Detail tab.
Note: You can quickly apply these settings to multiple RAW images by selecting them (click any one from the left panel and hit CTRL+A, or press CTRL and click the ones you want to select). Type in the settings and they get applied to all the selected images. | 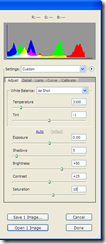 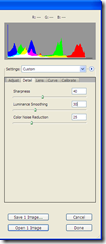 |
| 3. Now you can begin tweaking individual images. Click on the first RAW image in your series. Start with the exposure--move the slider so that image information (the graph) is evenly distributed through the spectrum. for the majority of your images, you can do this by moving the Exposure slider so that the graph isn't bunched up near the highlight area (the right side) or the shadow area (the left side). Of course, this wouldn't apply to images that are predominantly dark or bright--here, you'll just have to eyeball it and go with what looks natural. After all, a picture of a black puppy outdoors at midnight would naturally have very little (or no) information in the highlight area. | 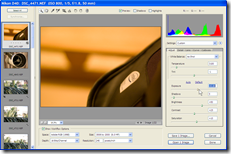 |
| 4. Next, nudge the Shadow slider until the left of the graph is comfortably within the area without being bunched up toward the edge. |  |
| 5. Now move the Brightness slider until you can just about see details in the darkest area of the image. Use your better judgement with this setting--if things begin to look weird, go with what looks natural. |  |
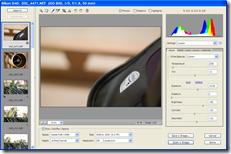
| 6. Next, you can set the White Balance. The great thing with RAW images is that they totally disregard the White Balance setting on your camera. So even if you selected an incorrect white balance value while shooting the image, you can fix it here without any loss in quality. Click the White Balance tool (the third icon from the left, above the image area). Next, click any white or grey area in the photo (I used the white Intel patch in this example). You'll immediately see the change in the image. For added creativity, you can impart a warmer or cooler look to your image by experimenting with the White Balance--do this by playing around with the Temperature slider. Finally, you can crop or straighten the image by clicking the relevant tool icons above the image window. | 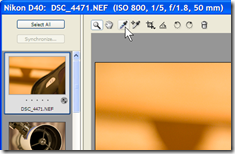
 |
| 7. Optional step: Camera RAW provides a quick method to apply one or more settings from the selected image to several other RAW images. This is a great way to assign similar processing settings to a sequence of images shot in the same environment, for example. Start by clicking the image you want to copy parameters from. Then press the CTRL key and click other images to which you want to copy the settings. Click the Synchronize... button above the thumbnail strip on the left. You'll see a box that lets you checkmark several parameters for copying to the selected images. Click Ok, and all the chosen settings get applied to your selected images--a great time-saving feature! | 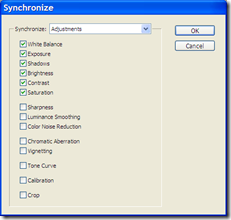 |
| 8. After making changes to all your RAW images, click Done from the main Camera RAW interface. You are now ready to process these images--on to the next section. | |
The final stage is processing these RAW images and creating JPEG or TIFF files that you can e-mail or print. Here's how you do it:
| 1. Start Adobe Bridge by clicking its icon next to the Brushes Palette. |  |
| 2. Using the drop-down under the menu bar, select the drive, then browse to the location on your hard disk where your processed RAW images are stored. Select all the RAW images (click on any one in the interface and hit CTRL+A) | 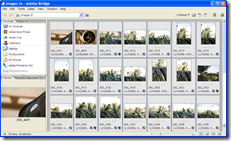 |
| 3. Click the Tools menu item, select Photoshop, then click Image Processor... |  |
| 4. You'll now see a box from which you can configure several output options for your images. This adjoining screenshot shows the settings I use--these create high-quality full resolution JPEG files with embedded color profiles. When you're ready to create the output images, click Run. |  |
Now sit back as Photoshop chugs through the process of applying your previous settings, and converting the RAW images into useable output images. Being highly processor intensive, you might have to wait a bit depending on the number of images and the speed of your computer. But the results are so definitely worth it.
Update: I've now switched over to Adobe Photoshop Lightroom 2.1 for my RAW image processing. Click here to learn more about Lightroom 2.1 and my image processing workflow.


2 comments:
Hey Marco,
That was definitely useful. Thanks a ton! Now that I have understood the basics (especially, the saturation; and how to read the graph and stuff), I can get down to editing my RAW images.
Thanks a bunch again.
Glad to have been able to help, Kiran. Over the last few days, I've been playing around with Lightroom 2 and it's now my new weapon of choice before I head into RAW battle. I've written about my initial experiences with it.
Post a Comment