Monday, March 2, 2009

Origami works of art

In an earlier post, I mentioned my interest in paper folding, and how fascinating it is to build interesting objects from simple materials. Back in school, I remember those lazy summer days, when I used to try and create everything from Origami flapping birds, to geometric shapes, to aerodynamically accurate paper aircraft! Of course, not all these endeavors were met with success, but it was a heck of a lot of fun.

Having been bitten by the paper folding bug recently, I decided to dig a little deeper and find out exactly how complex this art form can get. These days, there are hundreds of Web resources that will teach you the fine art of making paper models, complete with scientific explanations, and even instructional videos--it's on a different level altogether! An hour of digging through online resources and I came away amazed. Here are some of the best paper folding models I found--they can take anywhere from a few minutes to over 40 hours to create!

First up is what is touted to be the World's best paper airplane. Known as the O'Reilly airplane, it features all the aeronautics you could want in a paper aircraft--working rudders, stabilizers and flaps. Best of all, it takes minutes to build, and is scalable--the larger and stiffer the paper, the better it is likely to fly!
Click here for the step-by-step folding instructions, and here for a video on how to fold the plane.
BestPaperAirplane1
Another one of my personal favorite paper airplanes is the 'Barnaby'. Designed by an ex-US Navy pilot, this plane is one of the easiest to build, and it flies like a dream!
Click here for the step-by-step folding instructions.
Barnaby
Moving on to more traditional forms of Origami, one of my favorite (and more challenging) paper objects is the Kawasaki rose. You'll need at least intermediate paper folding skills to attempt this model, but the results are great.
Click here to download the PDF of the folding instructions.
Kawasaki rose
Then there's this ultra-cool and super-realistic Noboru Miyajima bat! The level of detail and faithfulness to anatomy in this model is truly awesome. This is a rather involved model (it consists of a shade over 100 folding steps). But then again, the results are fantastic.
Click here to download the PDF of the folding instructions.
Noboru bat
If you're a movie buff, you'll be stoked by the characters on this page--you'll find Gandalf, Yoda and even Wall-E, all Origami-fied! Not all the authors have shared the folding instructions, but you'll find a video of the Wall-E character on this page. wall_e1

Later on, when you get bored of folding 100-step Origami characters, you'll want something that presents a bit more of a challenge. If you're like Satoshi Kamiya, a 27-year-old guy from Japan, you should be ready for the 200+ step designs. This guy is credited with developing some of the most advanced and complex Origami ever folded. Relying solely on his intuition and skill (that's right, no computer programs to assist), he creates true works of art with paper--from dragons, to mythical creatures, to animals and fish, check out the level of detail that's possible with with paper folding.

origami-mantis Kamiya-16_0
Satoshi_Kamiya__s_Bahamut_WP_by_Vargaskyld Ancient dragon

And then at the pinnacle of his skill...

dragon-origamiThis is an 8-inch model of an Eastern dragon, and is detailed with eyes, teeth, a tongue, whiskers, a barbed tail, and over 1,000 individual scales on its body. And yes, this model was folded from a single piece of paper. I'm in awe.

Check out this video of Satoshi Kamiya at work:

He's authored a book containing the folding instructions of all these fantastic paper models. If you're so inclined, you can buy it from here.

Finally, check out these informative online Origami resources here and here.
Wednesday, February 18, 2009

Playing classic DOS games using Microsoft Virtual PC

If you were a teenager during the late 80s or early 90s, you'll be awash with a wave of nostalgia when you read these words: Dangerous Dave. Wolfenstein 3D. Doom. Prince. Zaxxon. Brings back memories, right? If you're still clueless, these are classic DOS-based games that used to take up a sizeable portion of our leisure time back in the day! Still don't know what I'm talking about? Well, DOS is a text-based PC operating system... oh, never mind--you're way too young to be reading this post! If you really must know, I'm talking about an era where the GUI was still several years away, a time when computers were built using 386 and 486 processors, with a whopping 8MB of RAM, and 240MB hard disks. *Sigh*... those were the days--the heady, primordial era of personal computing.

capture_17022009_234951 I revisited those days recently when I was experimenting with a cool application that lets you run any operating system--current, past, or upcoming--within your present Windows operating system. That's right, you can run an operating system as if it were an application! I'm talking about Microsoft Virtual PC--a small, free software that emulates another PC within yours. Sounds confusing? Well it isn't really. This application creates an isolated area in your system, within which you can install and run a completely different operating system as if it were another computer. You can even reboot it and watch it go through the boot-up POST sequence in it's own window!

You might have heard of a similar application called VMWare, which does the same thing, but VMWare is rather expensive compared to Microsoft Virtual PC, which is free. But then Virtual PC is primarily built to run Windows operating systems, of course.

VirtualPC_Win7_Win311Among other things, I used Virtual PC to install and experiment with a beta copy of the upcoming Windows 7 (Build 7000). Alongside this, I also created a Virtual PC running good ol' DOS 6.22, and dug up a whole load of DOS applications and games. I also located and installed an ISO of Windows for Workgroups 3.11! Click the screenshot above for a larger view--there's Windows 7 on the left, Widows 3.11 to the right, and the Virtual PC Console at the lower right, showing the two running operating systems. All of this was running on my Windows XP laptop.

Here's a quick run-through of how to create a Virtual PC:

1. Download Microsoft Virtual PC 2007 from here, then install it. Run the program and you'll see the Virtual PC Console.
On first run, you obviously won't have any Virtual Machines (VMs) installed--shown here are the two VMs I created.
To create a VM, click the New... button to launch the New Virtual Machine Wizard.
capture_17022009_235739
2. Click Next to proceed. capture_17022009_235938
3. This screen displays choices for creating a new VM, using default settings to create a VM, and adding an existing VM. Select the first option, and click Next. capture_18022009_000105
4. Type in a name and select the location for your new VM, then click Next. capture_18022009_000326
5. This screen helps you configure the environment for your VM, depending on the operating system you want to install in it. Select the appropriate OS from the drop-down menu, or select 'Other'. Click Next to proceed. capture_18022009_000441
6. You can go with the recommend RAM for your VM, or specify the amount. Your choice will obviously depend on how much RAM your computer has, and the requirements of the OS you want to install in the VM.
Note: Before allotting RAM to the VM, make sure you leave aside enough for your host operating system!
capture_18022009_001111
7. The Wizard will now create a virtual hard disk, in which you'll be installing your virtual OS! Choose to create a new virtual hard disk, click Next... capture_18022009_001758
8... and specify the location and size of this hard disk. capture_18022009_001807
9. Finally, click Finish, and the wizard will create your Virtual PC! capture_18022009_001929

Your new Virtual PC will now appear in the Virtual PC Console. Double-click it to start it, and you'll see it going through the boot sequence. Obviously, on first run it will search for a boot device and will prompt you accordingly. Before you can use the Virtual PC, you'll need to format the virtual hard disk, and load an operating system on it. To start, download a bootable CD or floppy disk image from here, and load the appropriate ISO file using the Floppy | Capture Floppy Disk Image or the CD | Capture ISO image. You should now be able to format the virtual hard disk as you would a normal one. After that, load your operating system and configure it to your liking!

Here are a few screenshots from my 'Classic DOS games' virtual machine.

DOS_nostalgia

For more resources on Microsoft Virtual Machine see here and here. Also see here for special information on running MS-DOS on Virtual PC 2007. Enjoy!

Thursday, February 5, 2009

Cubeecraft: Geeked-out cutouts!

CubeeCraft I've always liked paper folding, and have been following arts like Origami ever since the early school days. I know--it's not a guy thing, but I was interested in it from the mathematical standpoint. Or so I explained. Even the simple act of flying paper airplanes was complicated with extended pursuits of trying to hone them for prolonged flight, or funky acrobatics!
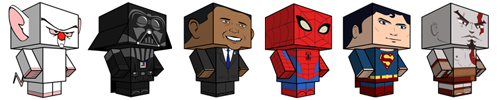
Then a couple of days ago, I came across this ultra-cool site, and was bitten by the paper folding bug once again. The author of this site has pretty much nailed down the art of creating some of the coolest paper characters I've seen. And what characters! Classics like Mario (of the Super Brothers fame), Darth Vader, Sonic the Hedgehog, Spiderman, Superman... heck, there's even Kratos (from God of War), Pinky (from Pinky and the Brain), and Obama! If you're particularly skilled in digital illustration, you can also download a blank cutout template and try your hand at creating your own character!

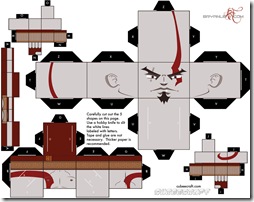
Kratos Creating one of these characters is relatively simple--head over to the Cubeecraft Web site, download a cutout template, print it at 150dpi on an A4 cardstock paper (thick paper begets a longer-lasting character), and use a pair of scissors and a blade to carefully cut out the shapes. Each character is composed of five or more 'sections' that must be folded and assembled into the final character. Best of all, the sections have a glue-less design so the process is relatively clean (discounting the cutout shrapnel, of course).

The FAQ explains the assembly clearly, but know that you'll require at least an hour to complete each character. Your mileage may vary depending on your dexterity in wielding cutting instruments, and your patience through this exercise--creating some of those slits and tabs can be quite painstaking.

But if done correctly, the end results are guaranteed to leave you stoked and addicted. Gotta... build... one... more... Cubee...!

Sunday, February 1, 2009

DVD Flick: Converting videos to DVD

Ever needed to convert a whole lot of videos into a DVD? Here's a handy little tool that enables you to do just that: pop in a blank DVD, point the application to one (or more) videos on your hard disks, configure a few basic settings and boom--you have a DVD that will play on any conventional player. DVD Flick is especially useful for converting DivX movies into DVD format (great for sending movies to your mom who has an older DVD player, or for compiling and distributing video clips recorded on your digital camera).

DVDFlick DVD Flick is one of those ultra-handy Open Source applications that do a fantastic job of serving a specific requirement quickly and efficiently. Creating a DVD with this application is child's play. Start by downloading the program from here. After installing it, click the Guide icon on the top and you'll see a quick and easy run-through for creating a DVD. You can create a regular DVD in just a few clicks, with the default program settings. But you can also customize your DVD with additional audio tracks (such as director commentaries) and subtitles. You can add several videos in a given title, and the application will figure out how best to encode them to fit on a single DVD. You can choose between the single-layer DVD-5 format (4.7GB), the dual-layer DVD-9 format (8.54GB), or even the more exotic Mini-DVD (1.35GB or 2.47GB) formats. Of course, you will need the appropriate type of blank DVD to hold a given project. When creating a compilation of videos, you can even create an interactive menu that enables you to navigate your disk and select files during playback--much like the main menu of a conventional movie DVD.

DVD Flick will create a DVD from virtually any type of video file you might want to throw at it (it supports for over 70 video formats), including FLV, DivX, TrueHD, H.264, Apple Video and many more. See here for a complete list of audio and video codecs this versatile application supports.

Based on the powerful FFMPEG video processing engine, this is a processor-intensive application. So the time it takes to create a project will depend on your computer's horsepower. Fortunately, it supports and even detects multi-core processors--a definite advantage if you plan to use this program for a serious amount of DVD creation. Finally, you can use the program's built-in DVD burning capability, or have the application write the files to your hard disk where you can subsequently create your DVD using your favorite DVD burning application. Simple and fun!

Thursday, January 8, 2009

Building a Web site using Kompozer

Now that we've gone through the motions of what's required to get started with building a Web site--booking the domain and selecting a hosting provider--we're now on to the final stage of actually building the Web site! This step involves creating the HTML files that contain the site content, and link to other elements like images, downloadable files and whatever else you might want to include on your Web site.

Building a Web site can be creative, or quick-and-dirty. The path you choose depends on:

  1. Your skill with Web designing
  2. Your knowledge of Web programming
  3. Your access to Web design applications
  4. The duration you have to complete the project

Assuming you're like me, you:

  1. Have no formal training in Web programming or design
  2. Have no Web programming skills
  3. Are reasonably skilled with Photoshop and image editing

I know, this doesn't look like too promising a position to start at. But that's the beauty of the Internet coupled with a bit of passion--you can learn pretty much anything, and produce reasonably decent results. In my case, I embarked on my Web site building journey about a month ago while chatting with Anil, a close friend of mine who's spent the majority of his life doing some amazing work rehabilitating destitute, aged, and mentally challenged individuals. Having been doing this for over 20 years and operating on razor thin budgets, we decided that it was about time we put his Institute on the Web and make its work known to the World at large. That's when we decided to build a Web site for the Cardinal Gracias Institute.

After the idea took seed, we were completely stoked at the journey that lay ahead and dived headlong into it. In our five-step plan, we:

  1. Created the site map and identified the site's major sections.
  2. Wrote content for each of these sections and refined it until we were satisfied.
  3. Selected the hosting provider hours of comparing (I finally chose Host Monster).
  4. Went about designing and building each of the Web pages using Kompozer.
  5. Incorporated cool functionality (rollovers, maps and slide shows) by digging up free code snippets from online resources.

I've already covered the first three points in my earlier posts, so here I'll mention briefly about my adventures with Kompozer--an open source Web authoring tool--and touch upon other resources I used to spruce up the Web site's functionality.

If you've heard of applications like Adobe DreamWeaver and Microsoft FrontPage, Kompozer lives lower down the capability scale, but still offers enough functionality to get started with Web design.

Let's start with the application's interface. At first glance, its toolbar closely resembles a word processor with the usual buttons for adding text, images and tables, and formatting these elements. But instead of creating document files, this application generates HTML files that can be subsequently uploaded to your Web server using the built-in FTP tool. capture_08012009_161454
The large area beneath the toolbar displays your Web page in one of several views: Normal, HTML Tags, Source, and Preview. You can switch between these views by clicking on the tabs at the lower left of the interface.
To learn more about this application, head over here for excellent explanations on its features and functionality.
capture_08012009_162155
I started building the Web site by first creating 'mock-ups' of how the key pages would look--this included the Home page, and the inner page templates. For the site design, I used a traditional header image on top, the navigation bar on the left, and a vertically scrolling content area.
I took several photos when I visited the institute earlier, which I used extensively in the design. To keep all the images together, I created a table and arranged, merged and added cells to accommodate these images and text blocks on each page. You'll see the boundaries of each of the cells in the adjoining screenshot (click for a larger version).
I designed these pages by studying the method described here. After creating the main home page, I simply created copies of this page and used these as starting points for the inner pages. Doing this ensured consistency.
capture_08012009_163911
I prepared the banner, side bar and the various photos using Photoshop, using basic Photoshop layer effects (outer glow and drop shadows). The swirly font in the main title and the side bar is 'Chopin', and is freely available. For all the images, I used 'Save for Web' (at 80 percent quality), as I found this to be the best blend of image clarity and file size. Remember that all Web elements should be as small as possible to result in the quickest page load performance. capture_08012009_172651
I found a freely available Javascript code to create a rollover effect for the sidebar categories. To create these rollovers, I used two images for each of the category labels--one with the normal text, another with the outer glow effect. The Javascript code simply swaps the highlighted version with the normal version when you hover the mouse over each label. All I did was incorporate this Javascript code into the header section of the HTML pages, and make a few changes to the image references.
I later stumbled upon a supposedly more elegant way to achieve this effect using the CSS method--see here for more details.
capture_08012009_174039
I incorporated a photo slide show in the site using the outrageously simple method of embedding a Picasa slideshow into a Web page.
Using a similar approach, I also embedded a neat Google map pinpointing the location of the Institute on the 'Contact us' page.
capture_08012009_174624

Feel free to head over to the Cardinal Gracias Institute Web site to see how these techniques took to life.

On a separate note, I'd really appreciate if you could spend a few minutes to learn more about the selfless work that Anil and his dedicated team do at the Institute. Feel free to contact him directly if you're keen on knowing more, visiting the institute, or (better still) helping out in cash or kind.

Related Posts with Thumbnails