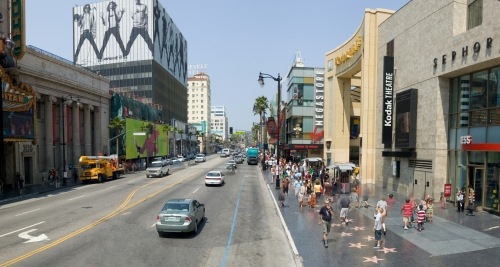
 Very often we come across a breathtaking expanse of scenery that just begs to be captured for posterity. A sunset at the beach, a gaping valley during a hike in the hills or even a city view from the 20th floor can lend itself to a stunning panorama photo. Unfortunately, not all cameras are equipped to do justice to such photo ops. Once again, digital tools come to the rescue to help you grab that vista with even the humblest of digital cameras. The solution is to 'stitch' multiple images together into one king-size photograph. The photograph above is of Hollywood Boulevard, taken with a Nikon D40 DSLR using the technique described below.
During my Canon PowerShot A60 days, I used a bundled application that enabled me to capture several overlapping photos of a scene, and stitch them together into one composite photograph. But this software (like most other similar bundled panorama applications) was not very reliable, and I often ended up with badly distorted pictures. Then I discovered a fantastic imaging utility created by a Canadian student as part of his PhD project -- it's called AutoStitch. The amazing thing about this tool is its reliability, and predictably fantastic results. After downloading this tool, all you need to do is configure a few settings regarding the size of your final stitched photograph and the JPEG compression quality. Then you simply point the tool to your source images and voilà, a perfectly stitched panorama! Here's how you do it:
Shooting the source pictures:
- If your camera has a manual mode, it's best to use it so that all of the images will have the same exposure and focus settings. Point your camera at a neutral area in your scenery (not too dark or bright), and note the shutter speed, aperture, ISO and focus settings. Next, set your camera to the manual mode, and use the settings noted earlier. If your camera has manual focusing, use this to prevent it from re-focusing at each shot. This way, the exposure and focus will remain fixed between your shots--this is important during the stitching process later on, and will result in higher quality. The next step is to shoot the source images.
- The trick is to shoot multiple images of your scenery in the form of overlapping tiles. You can start at the top left of the scene, and move up-down, then left-right. If it's a simple horizontal pan, you can simply proceed from left to right (or vice versa), or
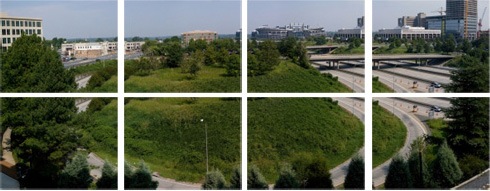 if it's a vertical pan, shoot top to bottom. AutoStitch does not mandate any specific sequence for shooting the images, but it is very important that the borders of each image overlap with the adjacent one by at least 20 percent. If the images do not overlap, it will result in errors and 'tears' in the final stitched image.
 - This application works best when all the source images are aligned, so remember to hold your camera horizontally (or vertically) while shooting the images--tilts between shots could cause distortion in the final photo.
- A good way to visually 'mark' this sequence of panorama shots as separate from your other photos in your camera is to precede and follow this sequence with a blank shot (by covering the camera's lens and shooting, for example). This will make it easier to identify the source image sequence after copying them to your computer.
- Preferably put all the source images for each panorama in its separate folder--they will be easier to process in the next step. Remember to delete the blank shots.
The next part is easy--stitching the images using AutoStitch:
- You will first you need to set up a few AutoStitch options. Click Edit, then
 Options.
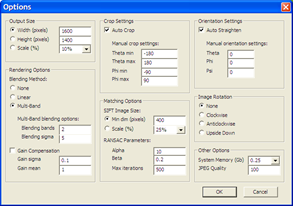
 - Don't be daunted by the screen that comes up--most of it contains geeky processing parameters that you can safely ignore. The important settings are the Output Size in the top-left corner and the Other Options in the bottom-right corner. Click the adjoining screenshot for a larger view.
- In the first, set the output size to what you want--1600 pixels wide is a good place to start. In the Other Options, select the System Memory setting that best matches how much RAM your computer has, and select the JPEG Quality to 100. Both these settings will affect the processing time for your panorama.
- Next, make sure the Auto Crop and Auto Straighten boxes are checked and click OK.
- Finally, click File and Open. Navigate to the folder on your hard disk that contains the source images for the panorama. Select the source images, and click Open. Note: Do not select any other images other than the source images, or it would result in an error.

You should now see a progress bar indicating each phase of the image processing as the application crunches through the source images. After it's through, you will find the final panorama in the same folder as the source images.
Check out some examples of panoramas created using this software here. Happy shooting!


0 comments:
Post a Comment