Tuesday, December 30, 2008

Setting up your own Web site: Part two

When it comes to setting up your own Web site, this much is clear--it's easier than you think. It all begins with getting a firm handle on the focus and intent of your Web site, and pulling together compelling content (see my earlier post here). The next step is to shop for online services that will help you book your domain name, and actually host your Web site. Let's see how this works:

Booking the domain name: Quite simply, the domain name is the name of your Web site. The first thing you'll need to do is check whether it is available. To do so, you can head over to one of hundreds of available Domain Registrars--these are authorized services that sell domain names. Some of the more popular ones are Network Solutions, Act Now Domains or Register.com. All you need to do is type in your preferred site name in the search field, and you'll find out whether it taken or not. When you find a name that's available, you choose the duration for which you want to book the domain name (ranging from a couple of months to several years--the longer you book it for the cheaper it works out). All domain registrars accept payment by a secure credit card transaction.
While deciding a domain name, remember to keep it short, simple and easy to remember. Also, you should preferably to choose a '.com' URL instead of '.org' or '.biz', as most people are accustomed to remembering the former.

HostMonster hosting featuresHosting your Web site: You will now need to select your Web site's home! Web hosting providers offer several plans (just like your cell phone operator, for example), that consist of a selection of hosting specifications. Just like a home maker shopping for a house, you'll need to consider these specifications before deciding on where you want to host your Web site. These factors include:

  • How much and what type of content do you plan to host? Depending on what your Web site consists of, you could require a few megabytes to several gigabytes of storage space. Look out for how much hosting space is offered and compare this with your requirements.
  • Do you know how to design and build a Web site, or would you like to work with pre-created templates? If you have Web design and coding skills (knowledge of Microsoft FrontPage or Adobe DreamWeaver, HTML programming, CSS, PHP and the like), you will most likely be designing your Web site on your computer, and then uploading it subsequently. If Web designing is new to you (and  you don't want to be bothered with the nitty-gritties), look for a hosting provider that offers 'Site Design' or 'Site Builder' capabilities. Here, you can access hundreds of pre-created Web site templates, where all you need to do is dump your content into these canned Web sites and you're ready to go. While this approach might limit your customization options, it is the quickest and simplest way to get up and running. Also remember that this convenience might come at a price premium.
  • How much site traffic do you expect? If you're setting up a commercial Web site that you plan to promote heavily, you will most likely have plenty of traffic coming to your Web site. hosting providers offer different 'bandwidths', which is the amount of data transfer they allow to and from your Web site per month. The greater the bandwidth you need, the  more you'll need to pay.
  • What other functionality do you need on your Web site? Many hosting providers offer basic extras like e-mail addresses, blog capabilities, spam filtering and programming language support, you can also select value-added services including SSL support (for securing communication between your Web site and its visitors), VPN access, video and audio streaming support.
  • What kind of support does the hosting provider offer, and how reliable are they? This is an aspect that's easily overlooked--there's nothing more frustrating than your Web site being unavailable when you need it, and not being able to reach its helpdesk quickly. The best way to check this is to actually make random calls to their helpdesk at odd hours, and ask them basic questions such as help on what hosting plan to choose, special offers running etc. The quality and timeliness of their responses will be an indication on your experience with them later on.

Some of the more popular hosting providers include Host Monster, GoDaddy, DreamHost, and Media Temple. Glance through their hosting plans and you will get an idea about the facilities offered. Note that several of these Web sites offer both domain registration and Web hosting services as a package--it's up to you to take these services from the same provider, or from separate ones. At the end of the day, it's about finding the right blend of price, features, reliability and support. Happy hosting!

Wednesday, December 17, 2008

Setting up your own Web site: Part one

Web site visual At first, it sounds like a daunting task in itself. You'd ask, "Isn't this something that only large companies with development and programming teams can do?" Actually, no--these days it's something that anyone can! So if you're thinking of popularizing your home business, or creating a platform for sharing your hobbies, or just setting up a home for your family on the Web, you can build a www.yourname.com Web site easier than you can imagine! All it takes is getting familiar with the process, and understanding some of the jargon you'll encounter along the way. After that, you make like you're strolling through the aisles of your favorite supermarket as you set off shopping for the right online services--it's actually fun! From end to end, you can be up and running within a week. Here's how you go about it:
At this juncture, you should grab a pen and a few sheets of paper and put down a whole lot of questions to which you'll need to eventually get answers.

  • What will be the focus of your Web site? The first and most important part of setting up a Web site is defining a sharp focus for what it will and won't do. Here's where you should decide the purpose of the Web site as sharply as possible: it could be an information repository for your gardening hobby, or an online store for your home catering business, or it could even be a Web presence for your local Golf players club. Once you have a broad set of answers to these questions, you can proceed to the next (and most important!) phase of building any Web site--creating the content.
  • Content, content, content. I can't stress enough how important it is to deliberate, brainstorm, create, and fine-tune the content for your Web site. Before doing anything online, it is all-important to have the content in place first. A good way to go about doing this is by visiting some of your favorite Web sites, and checking out the Site map section. A Site map is a hierarchical listing of the various sections and sub-sections in a Web site, and is the skeleton around which a Web site's content is fleshed out. Start by defining the major 'tier 1' categories of your Web site, then drill down to sub-categories. Each category should have a well-defined focus, and together they should encompass everything your want your Web site to convey. Also, try not to have more than three tiers of categories--a Web site should be designed to facilitate easy and quick access to its information, so your visitors shouldn't have to dig too deep.
    The content creation exercise can be plenty of fun, so involve everyone who's going to be part of the site, so you can get the widest range of ideas and opinions. Ideally, you'll need to progress through several rounds of brainstorming, writing and re-writing before finalizing your content. As a rule of thumb, when creating Web copy keep it simple, concise and to-the-point.
  • What kind of interactivity would you like your Web site to have? A Web site can be as Spartan, or as feature-rich as you'd want it to be. What you eventually decide will be influenced by the answers to questions like:
    • Do you want to include features such as online financial transactions, blogs, user forums, feedback systems, mailboxes and the like?
    • Do you have access to the technical know-how to include these features?
    • Would you want this interactivity at launch time, or can it be incorporated subsequently?

By now, you will have gathered the bulk of the content for your Web site, and you should have a reasonably clear picture of how it is going to pan out--and that's a big milestone! The next step will be exploring online services for registering your Web site's domain name, and finding a Web hosting provider that suits your specific requirements. Look out for my next blog post where I'll provide more details on this latter part of this Web site creation journey.

Update: See my blog posting on choosing a Web hosting provider here.

Saturday, December 13, 2008

Create images using text

I've always been fascinated with photographs, and being the geek I am I'm even more fascinated with interesting ways to create photographs! Here I'll explain how to create a neat form of geek-art known as ASCII art. What is ASCII art you ask? Let's talk about ASCII first--this is simply a standard that is used to represent text characters on your computer. So when you type on a keyboard, specific codes that correspond to each of the letters, numbers and symbols are used to tell the computer exactly what it is you are entering. This character standard is also used to store text in your documents. At its most basic level, it's the type of characters you see in Notepad--the no-frills, standard Courier font text.

ASCII art is the process of creating computer-generated images using just these text characters! Using freely available software, you can create stunning imagery by putting your favorite photos through these programs, which do all the mathematical calculations and decide what characters to use to simulate shading while creating the image! I know--it's difficult to imagine, so head over to the next section and see for yourself.

I've used several applications that create ASCII art, but have found ASCIIGen to be the best of them. After numerous rounds of trial and error, here's what I believe is the shortest way to get the best results using this program:

1. Download the program from the link above, unzip it to a folder on your hard disk and run the Ascgen.exe file.
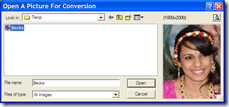
Press CTRL+N to start a new project. In the box that opens, navigate to your source photo.
Hint: Click these images for a larger version.
capture_13122008_033651
2. After loading the image, select the area you want to focus on, and set the height dimension to 200 as shown. capture_13122008_031809
3. In the next tab, increase the brightness until the image becomes a little too bright in the image preview. That's right--stop only when the image looks noticeably overexposed. capture_13122008_033245
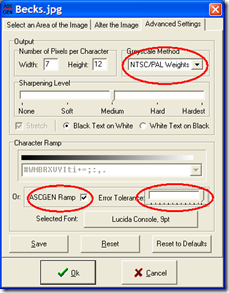
4. In the Greyscale Method section of the next tab, Choose 'NTSC/PAL Weights 2' from the dropdown list. Next, select the ASCGEN ramp checkbox, and lastly move the Error Tolerance slider bar all the way to the right as indicated.
Click on OK and the text file will be generated. Save this text file.
capture_13122008_031936
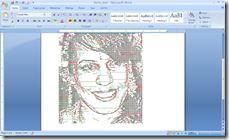
5. You'll now need to tweak this text file in MS Word to get your image right. Start by opening the text file you created in MS Word. Select all the text (CTRL+A) and set the font to Courier New. capture_13122008_032220
6. With the text still selected, reduce the font size until the entire picture fits comfortably on a single page without distorting. To quickly reduce the font size, press CRTL+SHIFT+"<" capture_13122008_032251
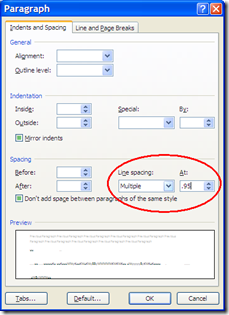
7. At this stage, you'll notice the image is slightly distorted. To fix this, select all the text, right-click it, and select Paragraph. In the Spacing section, enter a value ranging between 0.75 and 0.95 (see which value delivers the best results) in the 'To:' box and set it to 'Multiple Lines'. Try a few values until you're satisfied with the image.
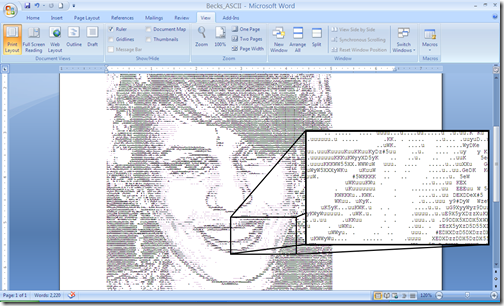
Finally, save this document as a Word file, and print it using the high text quality setting in your printer.
capture_13122008_032448

The final ASCII image

Surprise your friends--I'll bet they won't be expecting these kinds of renderings of themselves! Give them their very own ASCII art image and stake your claim to being their geekiest friend. Or not.

Friday, December 5, 2008

Adobe Photoshop Lightroom 2: Portrait tricks

Good photos begin with good technique. More than having a capable camera and great equipment, it's all about mastering the nuances of composition, understanding the capabilities of your equipment, and knowing how to capture the situation and subject. But even in the best of cases, it's good to know that you can use tools that'll help you lift the quality of your image just enough to push it into 'exceptional' territory.

The capability of today's digital cameras to resolve the tiniest of details in a scene can actually be detrimental--with their multi-megapixel sensors and high-quality optics, digital SLRs are especially relentless when it comes to capturing the good and the bad in a subject. With portraits, you can capture the colored serrations in your subject's iris as easily as the blemishes on their cheeks or the discoloration in their teeth. So while some schools of thought might deem this to be cheating, I say why not use technology to flatter your subject--be it a beautiful friend, a stunning landscape, or a luscious plate of chocolate cake!

Photoshop Lightroom 2 offers a great set of tools for touching up your photos--you can be as subtle or blatant as you want. Here are some of the tools I use when it comes to portrait photography, so that I can show my subjects in the best possible light (pun intended!).

For portraits:
When it comes to touching up portraits, I use the following tools in Lightroom 2 to make a few subtle changes that can make a stunning difference. Note that I first went through the basic image correction procedures as described in my previous blog post.

capture_05122008_012557

We'll first start by analyzing the photo and determining what needs to be fixed. In the picture above, the subject has great features to start with, but there are a few tiny aspects that can be fixed including blemishes, skin oiliness, and a slight discoloration in the teeth. To add a touch of glamour, we can also impart a bit of 'glow' to the skin. Now that we know what to do, let's dive right in!

1. Spot Removal: Go to the the Develop module and hit the [N] key, or click the Spot Removal icon beneath the histogram. Next, change the size of the reticle by using your mouse scroll wheel (if present), or the box bracket keys '[' or ']'. Make this reticle slightly larger then the skin blemish you want to eliminate. Click-hold on the spot, and drag the mouse to a clear patch of skin. You'll see the clearing effect in real time--leave the mouse button when you're satisfied with the effect. Repeat this process for all spots on your subject's face. The circles in the adjoining photo represent the locations where I used spot removal. Press the 'H' key if you can't see these markers. capture_05122008_012807
2. Skin smoothening: This is perhaps one of the most powerful effects you can use for portraits. In Lightroom 2, you can use the Clarity component of the Adjustment Brush in the Develop module. Press the 'K' key to access this tool, then enable the 'Show Effect Sliders' toggle switch. Click the Effect drop-down menu and select Clarity. Now drag the Clarity slider down to about -70, and set the Flow slider to 40. Remember: the lower the Clarity slider, the greater is the effect of the skin smoothening. Flow controls the intensity of the strokes while using the tool. Remember that you can also vary the Clarity later, because it is basically a layer mask whose intensity can be changed--all thanks to the fact that effects in Lightroom 2 are non-destructive.
To use the Clarity tool, click once on the image to enable the tool, then select an appropriate brush size (as described in point 1), and 'paint' across the skin areas only. Avoid using this tool on the eyes, mouth and other facial areas that have detail, because you don't want these areas getting blurred.
capture_05122008_013514
Hold the mouse pointer over the marker to see the areas you've affected (indicated in red). To erase the effect over a particular area, press the [ALT] key and paint those areas. Use this method to bring back clarity into areas you might have mistakenly smoothened. capture_05122008_014806
3. Dental magic: Give your subject a Julia Roberts smile in a jiffy! Once again, we use the Adjustment Brush, but this time we select Saturation from the Effects drop-down list. Drag the Saturation slider down to -100, and select a nice white color from the color patch. Also, check Auto Mask.
To use the tool, click once anywhere on the teeth area to enable the tool, then select an appropriate brush size (as described in point 1), and 'paint' across the teeth areas. After you've finished, hold the mouse pointer over the marker to see the areas you've affected (indicated in red). Use the technique described above to subtract this effect if you need to.
The teeth should now look visibly brighter. Be careful not to overdo this effect--vary the flow and make sure to leave a hint of color in the teeth. Overly white teeth can look unnatural and eerie!
capture_05122008_015641
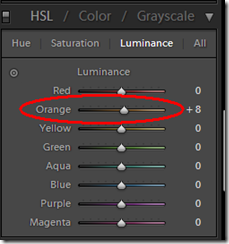
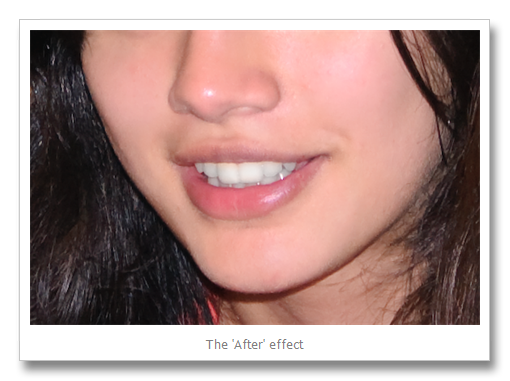
Glowing complexion: Here's a cool trick to add a hint of glow (and glamour!) to the skin. Scroll down the Develop module panel until you reach the HSL / Color / Greyscale section. Click on Luminance, and increase the Orange component to about +8. You'll see a subtle, yet visible difference!
Once again, resist overdoing it or your subject's skin just might begin to look fluorescent!
capture_05122008_020646

That's it! You should now have a much more glamorous subject. The only downside with these tweaks is the number of people who'll hound you to take their pictures, because 'your camera makes them look good'. If only they knew.

Sunday, November 30, 2008

Adobe Photoshop Lightroom 2: Development workflow

I recently had the opportunity to put this fine photo editing application through its paces--one of my cousins got married a couple of days ago, and I shot about 350 RAW images across the different marriage ceremonies (you'll find some on my Flickr Photostream). Faced with the prospect of churning out high-quality images from these RAW images in record time, I happily dug into the famed Lightroom 2 workflow. After several bouts of trial and error with color configurations and tweaking sequences, I arrived at the following workflow which I believe enabled me to extract the maximum quality from my RAW images in the shortest possible time. Remember that I already used Presets and Default settings to bring my photos to a more natural, higher-quality level before performing editing individual photos using the following steps.

1. Crop the photo: The crop tool can spell the difference between a good photo and a great one. While in the Develop module, hit [R] on the keyboard or click the Crop overlay icon indicated in the adjoining screenshot. Use the mouse to draw a box that defines the crop you need, or simply drag the control points of the crop box and pan the image until you're satisfied with the most interesting frame. Hit [Enter] to apply the crop. Crop overlay
2. Adjust White Balance if necessary: From the Basic settings in the Develop panel, click the dropper icon (indicated), and click on a gray or white portion of your photo. This will fix any color cast that might exist. Alternatively, you can intentionally invoke a color cast by playing around with the Temperature slider (labeled Temp) to impart a warmer or cooler color tone to your photo. White balance

3. Adjust Exposure: Now begins the meat of your editing. For the majority of your images, you can move the exposure slider until the Histogram graph spreads evenly, without clipping in the highlight (right) area.

4. Adjust Blacks: Adjust the Black level until the left side of the graph tapers off without bunching up against the left edge.

5. Adjust Fill Light: Fill light refers to the light in the shadows of your image. Increasing this slider value will bring out some detail in these darker areas of your photo.

6. Adjust Recovery: This refers to highlight recovery, and is used to recover detail from highlight areas that might be blown out. Be careful with this setting--increasing it too much might make your image appear unnaturally flat.

7. Adjust Brightness/Contrast: Play the Brightness slider against the Exposure slider to get the colors and balance your image just right. Remember that the lower the brightness, the better will colors show through.

Basic adjustments

These steps will get you off to a good start with bringing your images to a high-quality level. Next up, I'll focus on some Lightroom 2 tricks that will help enhance specific photos, like those of people, landscapes or food.

Update: Head over here to learn tricks for creating portfolio-quality portraits using Lightroom 2!

Adobe Photoshop Lightroom 2: Initial configuration

Ok, it's official: I'm hooked onto Lightroom 2. The sheer power of this program, its slick interface, and brilliant attention to user interface makes this the best imaging application I've ever used for my photographs. If you haven't read my initial experience with Lightroom 2, you'll find it here.

The groundwork 
Lightroom 2 offers several methods to help you streamline your photo processing workflow. The following steps will help you set up your Lightroom 2 environment with pre-defined settings that will lift the quality of your photographs during the import process, even before you begin tweaking them! This will let you reach your final result faster. You only need to perform the following actions once--they will subsequently invoke automatically each time you import your photos:

1. Define a camera profile: When I first started using Lightroom, I noticed something strange while importing photos--when each photo first flashed on the screen during the import process, it appeared to have nice, vibrant colors. But after getting imported into Lightroom, they appeared rather dull and faded. I needed to do a fair amount of tweaking with the saturation, highlight and black level settings before I was satisfied with the result. I later discovered that I wasn't using my camera's profile. Lightroom lets you define a profile that is specific to your camera model. Using this profile delivers a significant improvement in color rending, resulting in more vibrant and balanced images, so you'll need to do lesser work to bring your photos to the final satisfactory level.

First, head over here to download the camera profiles installation file from the 'Downloads and Installation' section (free registration required), then install this file. You will now be able to see the camera profile in the Camera Calibration section from the Develop module of Lightroom 2. Click the Profile drop-down at the start of this section, and select Camera Standard beta 2 (I found this delivers the most natural colors). capture_29112008_170943

2. Assign default settings to your specific camera and ISO:
In Lightroom 2, click Edit, Preferences..., and select the Presets tab. Ensure the 'Make defaults specific to camera serial number', and 'Make defaults specific to camera ISO setting' are selected. The significance of these settings will become apparent in the following step.

Lightroom settings_Make default

3. Define sharpening presets: Lightroom 2 features powerful sharpening and noise reduction tools to help you bring out image detail and clean up photos shot at higher ISO settings. The cool thing about Lightroom 2 is that you can create setting presets and bind them to specific ISO settings for your particular camera. This means you could define noise reduction presets for each ISO setting (where you would generally apply more noise reduction for photos shot at higher ISOs), and you can automatically invoke these presets while importing new images: the appropriate sharpening levels are automatically applied to photos according to their ISO. Cool, huh? This capability saves you the time you'd otherwise require for applying noise and sharpening tweaks to your newly imported photos. Here's how you create these presets:

Start by opening a photo shot at ISO 400, for example. Apply the sharpening and noise reduction settings until you are satisfied with the reduction in noise in your photo. The adjacent screenshot shows the settings I use to reduce noise at ISO 400 for my D40. View the photo at 1:1 zoom to be able to see the effects of the noise reduction. capture_29112008_171620
To to save this sharpening preset, click the 'plus' symbol from the Presets section on the left panel. In the box that pops up, make sure to check only the relevant sections that you have modified. Note that besides the Sharpening and Noise Reduction settings, I've also selected the Calibration option so that the camera profile will also be saved in this Preset.
Finally, to set this preset as a default camera setting, press the [ALT] key, and click the Set Default... button at the bottom of the Develop panel. A box pops up verifying your camera model number, serial number and ISO setting. Click the Update to Current Settings button.
Now repeat this step for photos shot at different ISOs, each time saving your Sharpening, Noise Reduction and Calibration settings to a new Preset for each ISO setting, and updating the default settings.
Create preset

That's it for the initial Lightroom 2 configuration. From now on, each photo you import will be automatically processed with the selected parameters according to your specific camera, and the photo's ISO setting. When working with tens and hundreds of photos, you will save significant amounts of time with these settings. Note that these are only presets: you are free to modify these settings while working on individual photos later on.

In my next post, I'll be talking about the basic settings and workflow I use while processing individual photos. Stay tuned!

Update: Click here for the Lightroom 2 development workflow I use while processing RAW images.

Thursday, November 27, 2008

Become a human calculator

1097236_business_or_education The one thing I detested about mathematics in school was the way the education system made it so theoretic. Learning trigonometry or Calculus was anything but fun, and it certainly didn't appear to be practical at the time. Even today, how many times do you hear kids say, "What am I ever gonna use this stuff for?" Math is, in fact, the most practical science there is--from calculating the curve of an aircraft wing (Fourier math playing a big role here), to modeling financial forecasts (mathematic extrapolation), math is the very foundation for almost every device and technology we use. But for the majority of us, it really isn't a cause excitement. So wouldn't it be great if there was a way it could actually help our everyday lives: like giving us the power to be the fastest human calculator at dinner with friends? That'd certainly beget admiration points! Well, there is such a field of mathematics that can help you do just that--it's called Trachtenberg Mathematics.

Trachtenberg Mathematics was invented by a brilliant Russian mathematician named Jakow Trachtenberg while he was imprisoned in a Nazi camp during World War II. He devised a simple set of rules that can help perform relatively large calculations quite easily. Sounds too good to be true? Check out this excellent Web site that explains this technique with lucid examples. After you're acquainted with the basics, there's a handy little software you can download here, which will help you get practice on this technique of speed math.

On a related note, you could also check out a similar form of speed math called Vedic math. There a ton of information behind this Wiki link. Also, here's still another really fun way to multiply numbers by simply drawing lines on paper! See the video below:

Finally, check out this excellent online resource devoted to speed math here. Hint: The tricks taught by these techniques are a great way to put an interesting new spin on teaching the subject to kids! Math? Fun? Who could have ever imagined?

Wednesday, November 19, 2008

Hard disk defragmentation: The easy, free way

If you're already well-versed with the concept of disk fragmentation, go ahead and skip to the next paragraph. If not, let's walk through why defragmentation is important to you. Computers are a lot like pets--you have to take care of them if you want them to stay healthy. I know, it's not the best of metaphors, but it's close. Computers consist of several components, all of which play an important role in its overall functioning, and eventually in providing a satisfying user experience. The component we'll examine in this article is the hard disk--the storehouse that holds all your applications and data. To visualize how it works, think of a hard disk as a cross between a magnetic tape and a record player. Of course, they have smaller electronics, faster speeds, and higher capacities. Hard disks consist of one or more magnetically coated platters on which the data is stored. This data is read by tiny heads that 'fly' above the magnetic surface as the hard disks spins. The heads are mounted on arms that are similar to the pickup on a record player. But like I mentioned before, the speeds are much higher--the platters are designed to spin at up to 10,000 rpm and the head/arm assemblies can move from the inner to outer track and back 50 times per second. Yes, they're that fast. So what has all of this got to do with defragmentation? Well, whenever you load an application or save data on the hard disk, it is written in the form of discrete 'blocks'. Depending on the size, a file can consist of one block or thousands. To maximize the storage space, these blocks need not be written in a sequential order--they can be scattered across the hard disk depending on the other data that is stored. The computer's operating system keeps track of these data blocks in a table--much like an address book. When a file is created, deleted or moved, it's address is

updated. Now the problem starts over time, when files, programs and applications are removed, loaded, copied and erased: the blocks of data that comprise a single program might be spread across the entire hard disk. Subsequently, the hard disk read/write head needs to work that much more to read or write a file as it locates its chain of blocks. But there's an easy remedy: arrange all of the blocks that make up the programs and files in contiguous sections so the hard disk can access them sequentially. This results in quicker access times and data transfer speeds, faster bootup, quicker application loading, and a smoother user experience. Defragmenting your hard disk can also maximize its operational life as it needs to do lesser work to access its data. Let's take a look at one of my favorite programs to get this job done.

Disktrix UltimateDefrag Freeware Edition
Ultimate defrag - Options This program is the Swiss Army Knife of defragmentation tools. There is a lot to like about it including the several defragmentation options, the comprehensive user manual that nicely explains the theory of defragmentation, and that fact that there's a free version available for this software. But the aspect that trumps other defragmentation programs is its ability to relocate applications, files, programs and directories to locations on the hard disk where access is fastest. And you can specifically select these applications. So if you're a gamer, you can optimize your installation of Bioshock, or if you're a digital artist, you can tune Photoshop for quick startup. Grab the free version here or the commercial version here. Be sure to read the manual if you want to deep-dive into what the program does. Unlike most other defragmentation tools, this one delivers results--I have a happier hard disk to prove it.

Wednesday, November 12, 2008

Adobe Photoshop Lightroom 2: I'm getting hooked...

In a recent post where I wrote about how I process RAW images from my Nikon D40 using Adobe Camera RAW, a reader replied asking about RAW processing tools with a little more chutzpah. I've been following the buzz that's surrounded the recently-launched Adobe Photoshop Lightroom 2, and decided to dive in and try it out.

I'm the kind of software user who builds long-term relationships with my applications. I need to coax myself a fair bit before committing to anything 'new and improved'. When I do encounter something that promises to change the way I live, I go through several phases that include flirting with the new software, reading about its capabilities and other users' experiences with it. It takes a while before I convince myself to toe-in and test the waters.

When it comes to processing images from my camera, I've always known, loved and trusted Adobe Camera RAW. Sure, it's no Swiss Army Knife of image processing, but it's simple, efficient and entirely effective. I've been using it for years and have never really felt the need to use any other solution. But recently, the lure of an enticing new interface,  a workflow-optimized layout, cool new tools for touching up portraits, and advanced photo cataloging capabilities was too much. A couple of days ago, I downloaded the trial version of Adobe Lightroom 2 from its Web site here (free sign-up required), and have been deep diving into its capabilities ever since.

Adobe Photoshop Lightroom 2

Some of the key 'a-ha' points with this application include:

  • Local adjustment brush: You can now 'paint in' exposure, brightness, contrast, even clarity and sharpness. These effects work like a layer mask, so you can also vary the intensity of these effects. And all of these changes are non-destructive.
  • Enhanced organizational tools: The process of importing files from disk or memory cards is quicker and more intuitive even compared to Bridge in Adobe Photoshop.
  • Volume management: You can browse and edit directories, drives and files as you would using a standard file management tool, and easily create quick groups of images.
  • Extensible architecture: Like Photoshop, Lightroom 2 can accept plug-ins written by third-party developers, helping extend its functionality and capability.

Other enhancements to the application include DSLR profiling, multiple monitor support, flexible print options, streamlined Photoshop CS3 integration, enhanced output sharpening and 64-bit support for Windows and Mac OS.

There are hundreds of in-depth reviews about this application out there, so I'm not going to repeat the superlatives that you'll already find in these write-ups. But here are some of the smaller aspects of this software that I personally found fantastic:

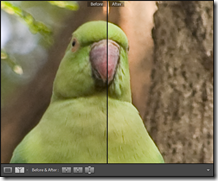
Compare views: Lightroom 2 offers several views to help you see the before and after effects of your modifications, including split screen, side-by-side and above-below. Intuitive. Simple.
Hint: Click these images for a larger view.
Compare views
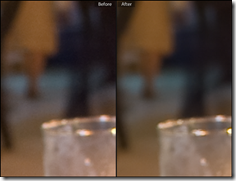
Excellent Sharpening and noise reduction: If you shoot at  higher ISOs, you'll love the new Sharpen and Noise Reduction capabilities. I was amazed as the creamy smoothness of a corrected image, and its ability to retain sharpness. I'd recommend Lightroom 2 for these two features alone. Lightroom 2 | Noise Reduction
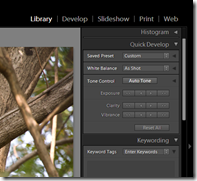
Quick development options in the Library view: Instead of having to trundle through the detailed image settings in the Develop module, there's a Quick Develop panel that lets you adjust basic image settings in the Library module. This functionality lets you quickly make broad image modifications before drilling down later. Lightroom 2 | Quick development options
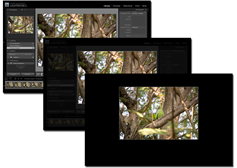
Lights Out: This is one of those features you'll like playing with. Hitting the 'L' key will gradually dim the interface leaving only the image in clear view--great for those times when you want to eliminate the noisy background and concentrate on your photograph. Lightroom 2 | Lights Out
Keyboard shortcuts galore: Its easy to whiz through the interface and get plenty of image processing done quickly, after getting accustomed to the keyboard shortcuts. You can be the Liberace of Lightroom. Sorry, couldn't resist that. Lightroom 2 | Keyboard shortcuts


Lightroom 2 has certainly made RAW image processing a whole lot more fun. And it's fast. To know more, head over to the Adobe Design Center where you'll find Help files and video tutorials. You'll also find a host of informative video tutorials and end-user experiences on YouTube and MetaCafe.

Now I've only got to find a way to cough up the $299 after the 30-day trial period ends. But I'll cross that bridge when I reach it. Get it? Bridge? Adobe? Oh, never mind.

Update: Click here for information on how I set up the initial configuration for Lightroom 2, and here for my Lightroom 2 development workflow.

Friday, November 7, 2008

Streamline RAW image processing

We've already seen the advantages of shooting RAW images here. Next, you'll need to quickly get used to chalking out extra time for processing these images. Depending on how shutter happy you are and how fast your computer is, this could easily run into a lot of extra time--a few hours even. The best way to quicken this process is to get into a groove with processing those images and develop a workflow that lets you crunch through them as efficiently as possible.

First, get to know your RAW processing software. Like any good artist, you need to have a keen understanding of your tools. No matter which RAW processing application you use, read the manual and learn it through and through. The faster you learn the lay of the land, the faster will you be able to navigate it, leaving more time for you to concentrate on tweaking your photos.

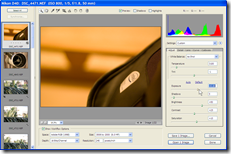
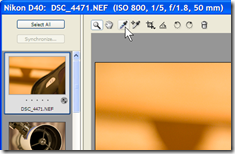
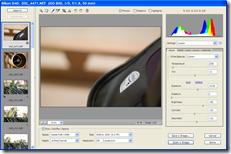
capture_05112008_234823 I use Adobe Camera RAW 3.7 (with Photoshop CS2). Camera RAW is a simple, fast and capable plug-in that facilitates RAW processing within Adobe Photoshop. It enables you to access all key areas of the RAW image, including exposure, shadows, white balance, sharpness, saturation and more. You can also crop, straighten and change the white balance in your images. Best of all, these changes are non-destructive--all modifications can be recorded in a separate XML file, so your original RAW images are safe. What follows is a run-through of the process I use while working with RAW images. This is a long post, so brace yourself!
Tip: Click on the images for the full-sized screenshots.

1. After copying the RAW images to your computer, select about 20 images, and drag-and-drop them into Photoshop. This automatically opens them in Camera RAW. You will see the series of images in the vertical pane on the left of the interface. capture_05112008_234930
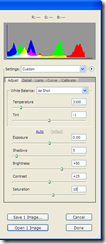
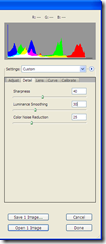
2. I usually dial in a set of fixed values for Saturation, Sharpness and Luminance Smoothing for all my RAW images. These settings work best with my particular camera--you'll need to experiment and find the best settings for yours. The three image parameters I edit are:
Saturation: 10
Sharpness: 40
Luminance Smoothing: 30
You'll find Sharpness and Luminance Smoothing under the Detail tab.
Note: You can quickly apply these settings to multiple RAW images by selecting them (click any one from the left panel and hit CTRL+A, or press CTRL and click the ones you want to select). Type in the settings and they get applied to all the selected images.
  capture_05112008_235036capture_05112008_235044
3. Now you can begin tweaking individual images. Click on the first RAW image in your series. Start with the exposure--move the slider so that image information (the graph) is evenly distributed through the spectrum. for the majority of your images, you can do this by moving the Exposure slider so that the graph isn't bunched up near the highlight area (the right side) or the shadow area (the left side). Of course, this wouldn't apply to images that are predominantly dark or bright--here, you'll just have to eyeball it and go with what looks natural. After all, a picture of a black puppy outdoors at midnight would naturally have very little (or no) information in the highlight area. capture_05112008_235325
4. Next, nudge the Shadow slider until the left of the graph is comfortably within the area without being bunched up toward the edge. capture_05112008_235356
5. Now move the Brightness slider until you can just about see details in the darkest area of the image. Use your better judgement with this setting--if things begin to look weird, go with what looks natural. capture_05112008_235418
6. Next, you can set the White Balance. The great thing with RAW images is that they totally disregard the White Balance setting on your camera. So even if you selected an incorrect white balance value while shooting the image, you can fix it here without any loss in quality. Click the White Balance tool (the third icon from the left, above the image area). Next, click any white or grey area in the photo (I used the white Intel patch in this example). You'll immediately see the change in the image. For added creativity, you can impart a warmer or cooler look to your image by experimenting with the White Balance--do this by playing around with the Temperature slider. Finally, you can crop or straighten the image by clicking the relevant tool icons above the image window. capture_05112008_235437


capture_05112008_235455
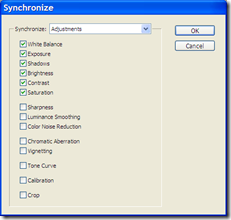
7. Optional step: Camera RAW provides a quick method to apply one or more settings from the selected image to several other RAW images. This is a great way to assign similar processing settings to a sequence of images shot in the same environment, for example. Start by clicking the image you want to copy parameters from. Then press the CTRL key and click other images to which you want to copy the settings. Click the Synchronize... button above the thumbnail strip on the left. You'll see a box that lets you checkmark several parameters for copying to the selected images. Click Ok, and all the chosen settings get applied to your selected images--a great time-saving feature! capture_06112008_002017
8. After making changes to all your RAW images, click Done from the main Camera RAW interface. You are now ready to process these images--on to the next section.  


The final stage is processing these RAW images and creating JPEG or TIFF files that you can e-mail or print. Here's how you do it:

1. Start Adobe Bridge by clicking its icon next to the Brushes Palette. capture_05112008_235537
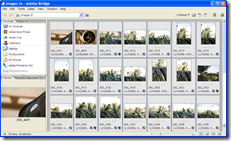
2. Using the drop-down under the menu bar, select the drive, then browse to the location on your hard disk where your processed RAW images are stored. Select all the RAW images (click on any one in the interface and hit CTRL+A) capture_05112008_235646
3. Click the Tools menu item, select Photoshop, then click Image Processor... capture_05112008_235715
4. You'll now see a box from which you can configure several output options for your images. This adjoining screenshot shows the settings I use--these create high-quality full resolution JPEG files with embedded color profiles. When you're ready to create the output images, click Run. capture_05112008_235752

Now sit back as Photoshop chugs through the process of applying your previous settings, and converting the RAW images into useable output images. Being highly processor intensive, you might have to wait a bit depending on the number of images and the speed of your computer. But the results are so definitely worth it.

Update: I've now switched over to Adobe Photoshop Lightroom 2.1 for my RAW image processing. Click here to learn more about Lightroom 2.1 and my image processing workflow.

Tuesday, November 4, 2008

RAW: The only way to shoot!

The fantastic thing about digital photography is the latitude it offers for extracting the best out of your images. And nothing exemplifies this more than the RAW mode found in many mid- to high-end digital cameras available these days. True to its name, RAW images are essentially raw dumps of digital image data, pulled directly off the camera's image sensor. In the absence of in-camera processing, enhancement and compression, these files are the most realistic representation of the image you've captured. Additionally, RAW images boast a higher dynamic range compared to JPEG images, for example. What is dynamic range, you ask? Think of it this way--the number of colors that the highest quality JPEG image can possibly store is about 16.1 million. While this may sound like a large number, it's actually far lesser than what our own eyes are capable of seeing. So if you shoot a stunning sunset with the sky lit orange near the horizon in front of you, fading into an intense violet near the clouds above you, a JPEG photograph will not have capability to encode and replicate this stunning range of colors. That's why you'll sometimes see those unsightly 'bands' rippling across images that have subtle gradations in color and brightness.

Enter RAW. Besides being an innately pure digital representation of an image, RAW files have a much larger dynamic range--they can theoretically recognize up to 4 trillion colors and shades. Practically, this number runs into several billions, which is still orders of magnitude better than JPEG. This obviously translates into far richer images. Another big advantage of RAW images is that they are far more forgiving to image processing--by working with larger dynamic ranges, the progressive loss associated with applying filter upon filter, brightening or modifying image saturation is far less pronounced.

The only downsides with RAW are the larger file sizes (they're often two to four times a similar JPEG image), and the extra time associated with 'processing' these images before you can e-mail or print them. But these are small prices to pay when you begin to experience the new level of image quality that only RAW can deliver.

In my next post, I'll dig a little deeper into how to get a smooth workflow going when working with many (ten, or even a hundred) RAW images. Once you've mastered this workflow, creating killer quality photos will be a snap.

Monday, November 3, 2008

Applications that watch the sky

So it's evident I'm on an astronomy trip these days. With the telescope cleaned and ready for action, I fired up the astronomy software I've been using over the past year. This application is actually quite dated (it indicates 2000-2003 on the splash screen!), but serves my needs quite adequately when it comes to figuring out what objects are in the night sky, how to pinpoint their location, and even pull up additional information on them. This software is Starry Night Backyard 4.0.5, and was included with an astronomy book my brother-in-law sent me (he took the subject as part of his credits at Davidson College). The thing is, I've never felt the need to upgrade this software because, well, the university doesn't really change in a hurry. Besides, this application pulls down all relevant satellite, comet, meteorite and asteroid information (the bits of space that do change in a hurry) from the Web and keeps itself up-to-date.

Starry Night BackyardStarry Night Backyard is a fantastic piece of software that delivers everything an amateur astronomer might need to get fired up--it provides a beautiful panoramic view of the night sky from your specific Earthly location, and lets you zoom in, obtain information and locate thousands of celestial bodies including planets, stars, satellites, exotica such as nebulae, galaxies, and deep space Messier and NGC objects. To make things easier, it indicates  wireframes of the popular constellations making them easy to locate, and provides a handy planner that shows celestial objects of interest in the night sky on a given date. Locating an object is simple--simply type the name in the Search box, and the relevant entries show up. Select an entry and the view is re-aligned to center on that object. This little software led me to discovering and viewing such fantastic sights as the rings of Saturn, Jupiter and its satellites, and many other treasures of the night sky--it's one thing reading about these in textbooks, and another thing completely to behold them live, in all their wonder: very evocative of an array of existential questions and musings.

Over the past few days, I've been poking around several astronomy Web sites and checking out some of the newer astronomy applications. Among them, I've found two particularly nice ones:

Stellarium Stellarium v0.10.0: This is an open source application aimed squarely at amateur astronomers (though it's also used to control sky domes in several planetariums around the world). This tool provides a simple, clean-looking interface with all of the features described previously in the Starry Night application. Two control panels at the bottom and left of the screen provide easy access to several tools to control how the sky looks, and lets you change a variety of settings such as your viewing location, time and date, field of view, playback speed and other parameters. Best of all, the night sky it renders is gorgeous--complete with twinkling stars and a realistic milky way. Click on a star or planet and its information is displayed in the upper left corner. Also, there are several keyboard shortcuts you can use to navigate through the application--all in all, a fantastic tool to get you going if you're an astronomy buff looking for a quick, clean stargazing application. Read more about it and download the latest version here.

MS WorldWide Telescope Microsoft WorldWide Telescope: Yes, even I didn't know that Microsoft makes these kinds of applications. This one is apparently from a group called Microsoft Research (hmm, I wonder what the rationale is behind them developing an astronomy application). Anyway, after downloading and using this free software, I actually decided it was a pretty cool astronomy tool. It primarily operates on the same principle as Google Sky--it downloads imagery and information on a particular object or starscape in real time. This is both a positive and a negative point: the speed at which the application renders the display is dependant on your Internet access speed--with the amount of visual data involved, this is a demanding application. However, the quality of these celestial objects is stunning, with the visual details added in as it downloads live data. Another cool thing about this tool is its potential to educate--depending on what you are viewing, it displays several contextual suggestions about nearby celestial objects. This makes it easy to learn about many interesting sights within a particular region. There's also a very informative 'Guided Tours' section that offers several audio/video presentations on constellations, the Hubble telescope, astrophotography and more. Download the latest version of this application here.
So which is the best of these? When it comes to general stargazing, I use Starry Night for its simplicity and speed, Stellarium for its gorgeous display and simple interface, and WorldWide Telescope if I need to get deeper into a particular subject. As they say in the motoring world: your mileage may vary. Either way, all have the potential to rev up any latent interest in astronomy.
Related Posts with Thumbnails