Good photos begin with good technique. More than having a capable camera and great equipment, it's all about mastering the nuances of composition, understanding the capabilities of your equipment, and knowing how to capture the situation and subject. But even in the best of cases, it's good to know that you can use tools that'll help you lift the quality of your image just enough to push it into 'exceptional' territory.
The capability of today's digital cameras to resolve the tiniest of details in a scene can actually be detrimental--with their multi-megapixel sensors and high-quality optics, digital SLRs are especially relentless when it comes to capturing the good and the bad in a subject. With portraits, you can capture the colored serrations in your subject's iris as easily as the blemishes on their cheeks or the discoloration in their teeth. So while some schools of thought might deem this to be cheating, I say why not use technology to flatter your subject--be it a beautiful friend, a stunning landscape, or a luscious plate of chocolate cake!
Photoshop Lightroom 2 offers a great set of tools for touching up your photos--you can be as subtle or blatant as you want. Here are some of the tools I use when it comes to portrait photography, so that I can show my subjects in the best possible light (pun intended!).
For portraits:
When it comes to touching up portraits, I use the following tools in Lightroom 2 to make a few subtle changes that can make a stunning difference. Note that I first went through the basic image correction procedures as described in my previous blog post.
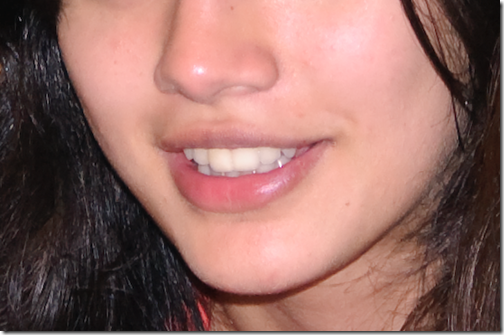
We'll first start by analyzing the photo and determining what needs to be fixed. In the picture above, the subject has great features to start with, but there are a few tiny aspects that can be fixed including blemishes, skin oiliness, and a slight discoloration in the teeth. To add a touch of glamour, we can also impart a bit of 'glow' to the skin. Now that we know what to do, let's dive right in!
| 1. Spot Removal: Go to the the Develop module and hit the [N] key, or click the Spot Removal icon beneath the histogram. Next, change the size of the reticle by using your mouse scroll wheel (if present), or the box bracket keys '[' or ']'. Make this reticle slightly larger then the skin blemish you want to eliminate. Click-hold on the spot, and drag the mouse to a clear patch of skin. You'll see the clearing effect in real time--leave the mouse button when you're satisfied with the effect. Repeat this process for all spots on your subject's face. The circles in the adjoining photo represent the locations where I used spot removal. Press the 'H' key if you can't see these markers. |  |
| 2. Skin smoothening: This is perhaps one of the most powerful effects you can use for portraits. In Lightroom 2, you can use the Clarity component of the Adjustment Brush in the Develop module. Press the 'K' key to access this tool, then enable the 'Show Effect Sliders' toggle switch. Click the Effect drop-down menu and select Clarity. Now drag the Clarity slider down to about -70, and set the Flow slider to 40. Remember: the lower the Clarity slider, the greater is the effect of the skin smoothening. Flow controls the intensity of the strokes while using the tool. Remember that you can also vary the Clarity later, because it is basically a layer mask whose intensity can be changed--all thanks to the fact that effects in Lightroom 2 are non-destructive. To use the Clarity tool, click once on the image to enable the tool, then select an appropriate brush size (as described in point 1), and 'paint' across the skin areas only. Avoid using this tool on the eyes, mouth and other facial areas that have detail, because you don't want these areas getting blurred. |  |
| Hold the mouse pointer over the marker to see the areas you've affected (indicated in red). To erase the effect over a particular area, press the [ALT] key and paint those areas. Use this method to bring back clarity into areas you might have mistakenly smoothened. |  |
| 3. Dental magic: Give your subject a Julia Roberts smile in a jiffy! Once again, we use the Adjustment Brush, but this time we select Saturation from the Effects drop-down list. Drag the Saturation slider down to -100, and select a nice white color from the color patch. Also, check Auto Mask. To use the tool, click once anywhere on the teeth area to enable the tool, then select an appropriate brush size (as described in point 1), and 'paint' across the teeth areas. After you've finished, hold the mouse pointer over the marker to see the areas you've affected (indicated in red). Use the technique described above to subtract this effect if you need to. The teeth should now look visibly brighter. Be careful not to overdo this effect--vary the flow and make sure to leave a hint of color in the teeth. Overly white teeth can look unnatural and eerie! |  |
| Glowing complexion: Here's a cool trick to add a hint of glow (and glamour!) to the skin. Scroll down the Develop module panel until you reach the HSL / Color / Greyscale section. Click on Luminance, and increase the Orange component to about +8. You'll see a subtle, yet visible difference! Once again, resist overdoing it or your subject's skin just might begin to look fluorescent! |  |
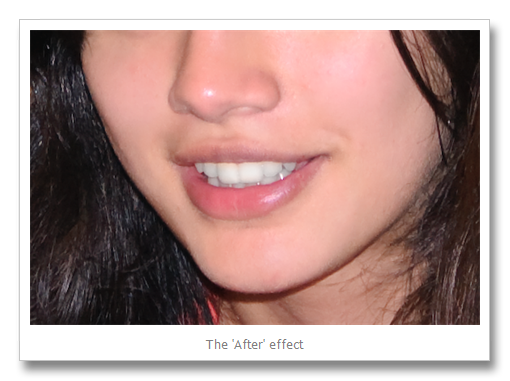
That's it! You should now have a much more glamorous subject. The only downside with these tweaks is the number of people who'll hound you to take their pictures, because 'your camera makes them look good'. If only they knew.


0 comments:
Post a Comment