Monday, April 27, 2009

Reduce noise in your digital photos

Noise is one of the most evident demons in digital photography—often manifested in those numerous, tiny, unsightly colored spots seen on the skin, skies and shadows in photos. While the best way to assuage image noise is to set your digital camera to use a lower ISO setting, this isn’t the optimal solution situations like shooting a dark scene, for example. So what do you do if you’re forced to shoot at a higher ISO, but still want to reduce the amount of noise in your images? You have several options—using one of the noise reduction filters in your image editing software, or using dedicated noise reduction tools like Neat Image or Noise Ninja. But there’s a simpler (and free) method to reduce the noise in your digital photos while maintaining overall image sharpness—it’s a technique based on the principle of averaging. Before we go into the details of this technique, a heads up on where this technique can and cannot be used:

  • You can use this technique to significantly reduce random image noise and sensor noise. This technique cannot be used against fixed noise patterns like bands, chromatic aberrations etc. The adjoining image shows what sensor (random) noise looks like.
  • This technique can only be used in still life shots or landscapes. It cannot be used to on shots of people, animals or scenes containing motion. You’ll see why later.

And now, on to the method.

Shooting the images: You will first need to take several shots of the same scene. The trick is to take the exact same photo of the scene keeping all settings constant across the shots. It is imperative that the images are perfectly aligned, so its best to shoot using a sturdy tripod, or by resting your camera on a solid surface. Noise_several_Images
Averaging the images: The cool thing about a mathematical average is that it brings a range of values to a ‘mean’ level. When applied to digital noise, averaging has the effect of reducing the effect of random noise across the image. Here’s how you do it:  
Load the images you shot into your favorite image editor. I’ve used Photoshop in this example. Make sure to load each image into its own layer, and also ensure that each image exactly overlaps the other—do not displace the images during this step. If you’re using Photoshop, the best way to ensure all images are aligned is by holding down [CTRL] and [SHIFT] while dragging the images into each layer with the Move tool. Load_Stacked_Images
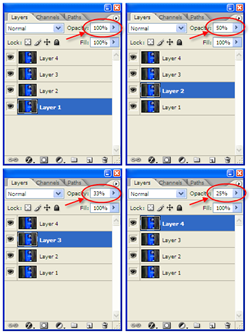
Change the opacity of each layer. Averaging is achieved by changing the opacity of each layer. Basically, each layer will need to contribute the same amount to the overall effect. Think of these layers as transparencies stacked atop each other—if we use four layers and we set each one’s opacity to 25%, it won’t achieve the effect we need. Why? Because the higher layers will need to be less opaque (more transparent) than the ones below, as these higher layers affect the apparent opacity of the ones below.
Case in point: If you’ve shot five source images, you will need to set the layer opacity as follows: 
Layer4: 25%
Layer3: 33%
Layer2: 50%
Layer1: 100%
This is assuming Layer1 is at the bottom of the stack and Layer4 is at the top as indicated alongside. Also ensure the layer blend mode is Normal. You’ll see the effect of the noise reduction as you change the opacity levels.
Layer_opacity_settings

If you’re mathematically inclined, the formula for calculating the opacity of each layer is:

 Averaging formula

Use this formula and you’ll figure out how we arrived at the percentages in the example above. You can use as many images as you want, but four or five images should be sufficient—the results of this technique won’t noticeable even if you use more.

When you’re done altering the layers’ opacity, merge them and save your image.
Voila, you have a cleaner image! I shot this photo at ISO 1600 on my Nikon D40—click below to see the results up close.

Noise_Before_After

Related Posts with Thumbnails