Wednesday, October 29, 2008

Readying the telescope

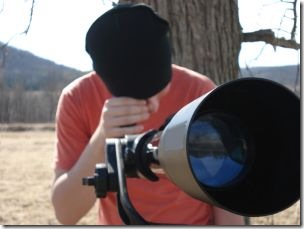
After managing to set aside a couple of hours, I was ready to clean and set up the telescope for some serious stargazing. It's been several months since I last used my Newtonian reflector--the Indian monsoon facilitates stargazing about as much as a hurricane does building a house of cards. Now that the Indian winter is upon us (yes, all 24 degrees of it--Centigrade!), the skies are finally clear with some of the most gorgeous constellations visible.

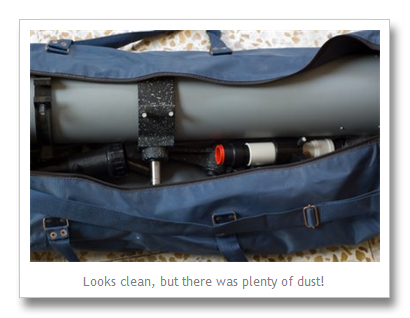
It all had to start with extracting the telescope from that inconveniently unreachable spot under the bed. Shuddering to think of what months of neglect would do to the telescope, I pulled out the large 4-foot bag (after moving several unknown, dusty boxes out of the way), and marveled at the way it was completely overrun with dust bunnies. Clearly, the first order of business was to wipe and wash it down. Without actually unzipping it and having those tufts of dust attack any of the components, I used a bit of elbow grease and got the bag to a relatively decent, presentable state.

Next, I gingerly opened the bag, hoping to discover the insides were spared of the under-bed filth. Fortunately it was, but only just. It beats me how dust finds its way into sealed zippers and plastic bags: the entire telescope assembly was coated with a fine layer of dust, enough to sign my name on.

Armed with a damp cloth, I got down to cleaning all the telescope's components and accessories. Here's what I was up against:

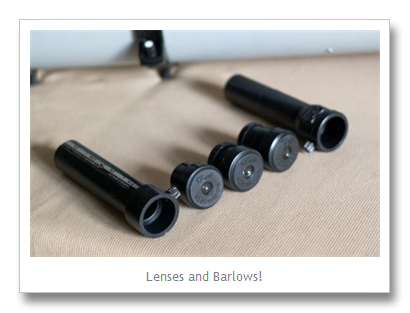
From left to right, there's the 1.5x - 3x variable Barlow, the three eyepieces (12mm, 17mm and 25mm), and the fixed 4x Barlow. These eyepieces provide different levels of magnification, and the Barlows are used to increase the effective magnification of the eyepieces when used in conjunction. There was also the 4-foot telescope tube and the wrought iron tripod that needed wiping down.

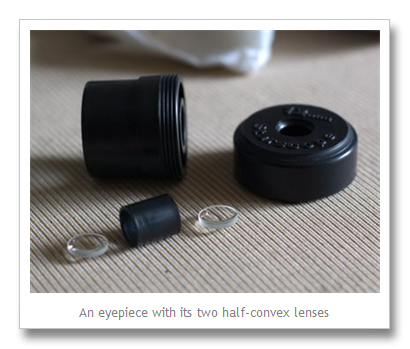
I started out by disassembling each of the eyepieces. Each eyepiece is composed of two half-convex lenses that provide a fixed magnification. Instead of using a single lens, a pair of lenses are used for better image clarity and lower distortion. I cleaned each of these two little lenses with a soft cloth, and re-mounted them with their convex sides facing each other inside the eyepiece.

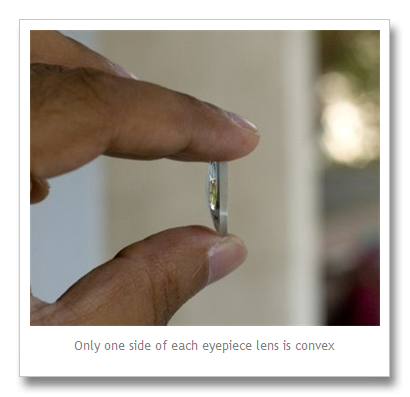
Here's what a half-convex lens looks like:

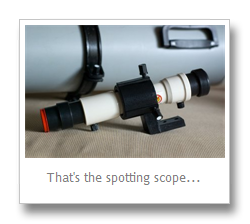
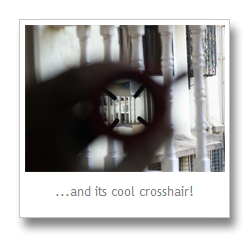
After cleaning all of the eyepieces, I focused on the spotting scope. The field of view in an astronomical telescope can be really small--especially at higher magnifications--making it painful to hunt around the sky while searching for Saturn or Andromeda. That's where the spotting scope comes in. This is a mini-telescope that is mounted on the main telescope. It helps find those elusive planets and stars in a crowded sky. There's a cool-looking cross hair in the telescope that enables you to pinpoint a celestial object, making it easier to view through the main telescope.

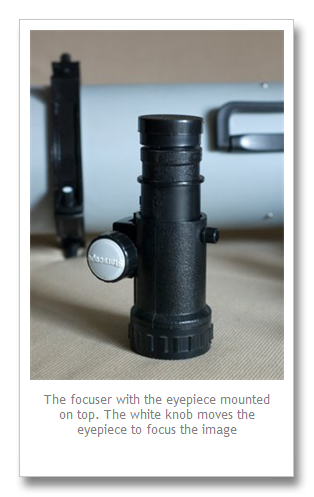
Next up was the focuser--this is a rack and pinion assembly that enables you to mount an eyepiece and move it back and forth to focus on a celestial object. You can change eyepieces depending on the magnification you need--a little thumbscrew holds them in place a the top of the unit.

Here's what the focuser looks like:

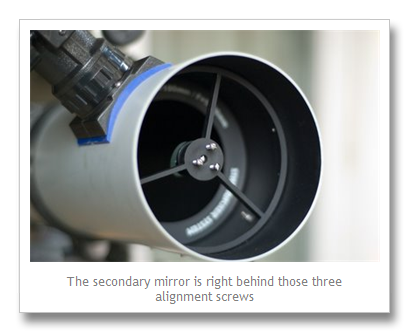
The secondary mirror was easier to clean because it's accessible from the open end of the tube and is small. I jiggered its alignment in the process, but I'd fix that later on during the collimation process.

Finally, the primary mirror--the most important component in a reflector telescope. I removed it by unscrewing three screws and extracting it along with its base. After all those years, it showed signs of age with tiny pitting and visible dust grains.

The best advise for cleaning any of the mirrors in a telescope is--DON'T! These mirrors are precision ground, and the reflective coating is on the outside (unlike ordinary household mirrors), making it easy to introduce nicks and scratches if touched. And if this happens, it can severely degrade viewing quality. I decided that the lens was not dirty enough to affect image quality, so I stayed off it.

Note: If you're thinking of cleaning your telescope's lenses or mirrors, see here for interesting techniques on how you can do so effectively and safely.

I was now finally ready to put these components together and get the telescope on its feet. This is how it all looked at the end of the two-hour cleaning and servicing spree:

After all the disassembly and re-assembly, the mirrors in the telescope were outrageously misaligned! So I collimated the telescope using the excellent (though involving) method described in this article from Sky and Telescope. You'll also find an excellent tutorial on collimation in this video here.

Now all I have to do is wait for the skies to clear up after the brief buildup of smog due to the Diwali firecrackers. Then, Orion--here I come!

Note: You'll find more details about my telescope's specifications in my previous blog entry.

Monday, October 27, 2008

Bring out the Newtonian Reflector!

Telescope My fascination for photography stems from a more deeply rooted passion for all things optical. I've always loved lenses and mirrors, and the funky things they do to light. Back in school, physics was never a subject--it was a thrill. A large part of this was due to my being introduced to this subject outside of the classroom. I inherited my dad's fascination with the subject, and he introduced me to the practical world of science at about the same time that Atari was on every kid's wish list. I was presented with my first telescope and hobby microscope kit way back when I was in 4th grade. I was, indeed, blessed. Over the years that I owned those two devices, I viewed everything from ants, spiders, fleas, leaves, and algae to planets, birds, wildlife and everything in between--I more than adequately covered the near and far field. School summers were spent poring over that little microscope and changing lenses for different magnifications, or carrying my refractor telescope while tagging along with dad as he went on his fishing trips at Bandra's Bandstand, a great spot for spin fishing not far from where we lived. Those were the days...

Flash forward about 20 years and I'm still a nut for optics (my shamelessly sycophantic rants on photography are testament enough). A couple of years ago, we (the wife and I) decided to invest in a decent telescope--after all, it's an educational, fun, and geeky device, and will be a super tool to educate young minds down the line, right? And for the time being, the kid in me was ecstatic! I bought this telescope from a company that manufactures them here in Bombay--Galileo Telescope. While shopping for the telescope, I needed to brush up on my fundamentals, and had to revisit several resources for telescope types, magnification powers, resolutions and other terms that were now muddy after all those years. While getting up to speed, I found a super resource in the Sky-Watcher Web site, which elegantly explains the intricacies of understanding and buying a telescope (be it for terrestrial or astronomical use). After several days of collating specifications and understanding fundamentals, I singled out a 4-inch Newtonian Reflector scope. At 4-feet and 6 kilograms, it was significantly larger than the school-time telescope I used, and it looked gorgeous. With its tube measuring a tad under a meter, mounted on a solid, metallic tripod, it adequately fired my passion for stargazing. I was hooked all over again.

Tycho Crater | Moon So what's it capable of? Well, it magnifies from 40x to 333x (though I don't generally use it at the upper end of its magnification), and enables viewing a 12 magnitude star (this refers to the apparent magnitude of celestial body--the higher the number, the fainter the dot in the sky). You'll find a full list of its technical specifications here.

This telescope offers reasonably good light gathering capabilities, and a nice set of accessories for observing different celestial bodies. The rings of Saturn, and the ray system around the Tycho crater on the moon (shown here) are sights to behold! Suffice to say that this telescope embodies pretty serious stargazing firepower.

It's been about two years that I've had this telescope, and it's been fantastic. Which brings me to why I'm ranting about it--it's finally time to bring it out of cold storage again! With the Indian monsoon being anything but ideal for stargazing, the Indian winter is great for it. The skies are clear, some of the best constellations are visible at this time of year, and it's comfortable weather--all conducive to plenty of astronomical action. It happens to be the festival of Diwali in the next couple of days, and I'll finally get time to unpack the telescope, clean and collimate the optical system before enjoying the months of stargazing ahead. More on this experience over the next couple of days.

Update: Talking about lenses and scopes, I came across this awesome new-age kid's microscope--the EyeClops BioniCam. Oh, to be young again.

Another update: Here's the telescope cleaning saga.

Thursday, October 23, 2008

Buying an LCD or Plasma display

Plasma_500 Given the multitude of choices these days, its easy to get lost in all the jargon while shopping for an LCD or Plasma television.

Here's the best way to approach it: start by grabbing a pencil and paper and putting down a few 'wants'. This will help you narrow the field. After that, it's all about figuring out the right specifications (doesn't matter if you source these from the Internet or from your friendly neighborhood electronics store), and the rest is easy.

  1. What are you primarily going to use the display with (Cable TV, DVD, Blu-ray, Computer)?
    Depending on your answers, you will need to look for the presence of the following 'input ports' on the display. This is what you'll use to connect video sources to the display.
    For Cable TV: This is the lowest-quality video source you can run through your display--all it needs is a Composite video or S-Video port, and the TFT/Plasma display will most likely have it. This is how you'll connect your set top box to the display.
    For DVD: For the best picture quality, look for a Component video port. Of course, your DVD player will also need to have one.
    For Blu-ray: A Blu-ray player provides a true high-definition video source (don't buy an HD-DVD player if you're thinking of it, because the standard is all but dead). For the best high-def video experience, look for a display featuring an HDMI port. This port delivers hi-def video and hi-def multi-channel audio on a single cable. Of course, the Blu-ray player should also have this port (it most probably will).
    Talking about cables, you can go cheap, or you can splurge on the good stuff--but a home theater system (like a chain) is only as strong as its weakest link! Look for cable brands like Monster, Kimber Kable etc. It pays to invest in good cabling.
    For a computer: You'll want the display to have a DVI or a VGA input (in decreasing order of display quality). Of course, your computer will also need to have a similar video output, and you'll require the corresponding cable.
  2. Are you constrained by installation space?
    If it's in a corner in your room, you might have to measure it out and decide on a maximum screen size. Also consider the feasibility of wall mounting.
  3. Do you have an existing audio system or will you primarily use the display?
    If you have a surround sound system, you needn't look for good integrated speakers in your display. Otherwise the best approach is to audition the display's audio capability at the showroom itself--don't trust the PMPO ratings!
  4. LCD or Plasma?
    It doesn't really make a difference these days, because both technologies have significantly evolved. I'd recommend LCD because it's generally cheaper, offers a higher resolution, delivers better contrast, uses lesser power, and is physically smaller and lighter compared to a Plasma display with similar specifications.
Along with these, look for the following minimum specifications:
  1. Screen size: 32-inches is a good place to start, but go in for the largest you can afford (after considering point 2 above).
  2. Resolution: At least 1,355 x 768 (For optimal HD support, resolution should be 1,920 x 1080 or more)
  3. High definition standard: 720p support (1080p support is ideal -- not 1080i, but 1080p. This signifies 'progressive scan', which delivers visibly higher quality compared to 'interlaced scan'.)
  4. Contrast ratio: This term is often misleading because all those advertised ratings of 'dynamic contrast ratio' is marketing fluff. Contrast ratio is the ability of a display to faithfully produce dark blacks and bright whites--the higher this ratio the more true-to-life the picture quality. But don't trust the numbers: instead, carry along your favorite DVD which contains scenes containing plenty of contrast, and have the sales person play it on the display. Here's a trick--use a 'THX certified' DVD movie such as Ice Age (if you don't own it, rent it out), and run the THX Optimizer which is part of the video extras. While this little tool primarily helps correctly setting up the audio and video system in your home theater, it is also an excellent (and easy-to-run) test to gauge audio and video capability. Follow the on screen instruction and you'll figure it out.
Of course, all this will be bound by the all important question--How much do you want to spend? Once you've finalized a list of specifications by overlaying the questions above with your specific needs, zero in on a brand and model that offers good warranty and looks good with your home decor. A woman's innately aesthetic opinion is immensely helpful at this juncture. And by now, you should most likely have found a winner.

Tuesday, October 21, 2008

Google's Android - The New 'Simple'

Simplicity is the key to adoption. Apple has more than proved this through its iPod and iPhone. But it looks like Google is poised to become the new 'King of Simple' with its new mobile operating system--Android. Personified in the T-Mobile G1, this phone is a must-have for any Google addict. But with its 'always-connected-to-your-information' approach, and by dissociating your data from the actual device, this looks like the first true Web-centric device for pretty much anyone who needs access to their data at all times--even if the phone itself is busted! Check out the video of this phone's cool capabilities here:

However, there does appear to be a few drawbacks in its current v1 avatar--there's apparently no straightforward support for Outlook mail, and it appears that none of your data is stored locally on the phone. I'm thinking the latter could prove to be quite a drawback in situations where you don't have network coverage. But I'm betting Google's already pondering these issues.

Saturday, October 18, 2008

Comics galore!

Comix If you like comics, you'll love this little software with the catchy name -- Comix. At 97KB, it's a minuscule download, but it serves over 60 comics right to your computer!

It is outrageously simple to use: select your comic from the drop-down menu and it pulls it down from the Web. Hit the 'Next' or 'Back' button to navigate the comic strip. You can even select a particular date the comic was originally published on the Web.

Download the application here, unzip it to a folder on your hard disk, and directly run the program file. All the relevant files are stored in the same folder, including the actual image files of comics strips you have viewed (so you could even load and use the program on a thumb drive, for example). The application offers virtually no configuration options, except for setting the slide show timer. But if you're so inclined, you can edit the INI file in the installation directory and tweak a few things like proxy details (if you're using one to access the Internet), or show/hide some of the features.

This application gives you unfettered, convenient access to such classics as Garfield, Heathcliff, Doonesbury, Andy Capp, and Animal Crackers, and several others that I've never heard of. The only downside is that some of my favorite comic strips are missing: Calvin and Hobbes, and Dilbert specifically. But the developers say they keep adding new strips, so things could change. Also, the application occasionally tends to act like it's frozen while accessing the Web. But these are minor, forgivable annoyances. After all--hundreds of comic strips. Free. Let's not complain.

Friday, October 17, 2008

Manage those movies

Filmreel These days we are pampered for storage space. With game-changing inventions like perpendicular recording, hard disks have comfortably hit the terabyte mark. Add to that, smarter manufacturing processes have driven down costs to the 15-cents-per-gigabyte level! Inevitably, the urge to fill these digital storehouses kicks in, and it isn't long before we find ourselves throwing in movie files that weigh in at a few gigabytes, or copying hundreds of MP3s--all of which quickly eat up those gobs of storage space. The answer to this? Add more storage space of course. It's so cheap, after all.

But there's a bigger concern here--bringing some semblance of order and sanity to all those media files. Let's talk about movie files--the good old DivX format can compress a movie  while keeping the audio and video quality surprisingly close to the original DVD. Little wonder that DivX (or XviD) movies are so popular these days. Of course, movie piracy is illegal. But you already knew that, right? With that mandatory warning out of the way, let's talk about managing these DivX movies.

ANT movie catalogYou will find several tools (both commercial and freeware) that can help bring order to your ever-expanding movie collection. These applications typically let you catalog your movies, download descriptive information (actors, director, release year, review, cover artwork and more). After cataloging your movies, you can search, query, or export the listing. Some cataloging applications even help you track rentals, so you'll always know where your movie DVDs are. You can even catalog your movies across different media--DVD, DivX and even VHS or Blu-ray. I've tried several applications, but have had the best experience with ANT Movie Catalog. This is a capable, feature-rich software that has all the capabilities listed above, and then some. And it's free.

Once you install and start the software, you'll pretty much see a blank interface. That's because you'll first need to add movies to your database. Here's the quickest way to do this.

  1. Press 'ALT+Ins' to create a new movie entry.
  2. Locate the DivX movie file on your hard disk, and drag-and-drop this file into the main program interface. The application reads the video information (resolution, running time, resolution etc) and populates the relevant fields in the new record.
  3. In the 'Original Title' field (the fourth field from the top), type in the title of the DivX movie you just added.
  4. Next,  press the 'F6' function key. This opens the scripting dialog box. Locate the 'IMDB' script. Never mind the many others: IMDB should suit your needs fine. Hit 'Enter'. Verify that the movie name is typed correctly, and hit 'Enter' again. If you're connected to the Internet, the program will pull down the relevant movie information. If it finds duplicate movie names, you can select the correct one.
  5. After the import is finished, you will see all the corresponding movie information in the respective fields. Now hit 'CTRL+S' to save your updated database. I save my database in the XML format, and store choose to store movie artwork as separate files. You will see this option while saving.
  6. By default, new movies are added to the bottom of the list. You can re-sort your movie list by name. Do this by clicking 'Tools', then 'Renumber'. Select the mode of sorting ('Original Title' works best), and hit 'Ok'.

There is no direct way to import several movies into the ANT catalog at one go. However, you can use the technique described here to achieve this result. Use this method to import all your DivX movies the first time you use ANT. Be sure to check out this application's other cool features in the 'Tools' section, such as the Statistics and Loans.

Monday, October 13, 2008

Must-have Windows Mobile applications

I've been using an HTC P3300 phone for about a year now. This phone is based on the Windows Mobile 6 operating system. Given that I've always been a Nokia user, I expected a reasonable acclimatization phase. As with achieving competence with anything new, I naturally progressed from fuddling around during the learning phase, to achieving a level of familiarity that made using the phone second nature. After I figured out the location of the controls, understood the capabilities, and learnt what features best served a given task, I was able to use its features almost unconsciously. That's when the phone became part of my daily routine and helped me get things done. However, while finding this 'sweet spot' of device usage, I needed to customize it so that it could fit my specific requirements better.

Fortunately, the Windows Mobile platform is very extensible, and there are hundreds of productivity-enhancing applications to choose from. I found the following (free) applications were just what I was looking for to make my phone a truly productive device.

A keypad substitute: Typing in information on a phone that doesn't have a keypad can be quite a pain. I tried the many inherent input methods that Windows Mobile offers: the on-screen keyboard, block recognizer and transcriber. But they all fell short of delivering the speed and accuracy I was accustomed to on my earlier phones. I decided I wanted the trusty, fast T9 keypad. I found the answer in PhonePad--a nifty little keypad application for touchscreen phones. It offers several modes of input (normal and T9), looks great, and has large buttons that even fat fingers would find difficult to miss. And you don't need a stylus to use it. Get the English version here. PhonePad
Audio/video playback: I use TCPMP, a small, efficient and very capable audio and video player for Windows Mobile. It plays MP3, WMA, DivX, XviD, WMV, and several other audio and video formats. Truly a must have. Download it here. TCPMP
WiFi profiles: If you have WiFi on your phone, you'll want a quick way to save and apply profiles for different wireless networks you might use (at home, office, or the coffee shop, for example). WiFi Profiles allows you to do just that--you can define and use individual settings like IP addresses, gateways, DNS settings and more. Download it here. WiFi Profiles
Voice and instant messaging: I use Fring for all of my VOIP and chat requirements. It enables me to simultaneously log in to several voice and chat services like MSN Messenger, Google Talk, ICQ, Yahoo and more. But I prefer to use the Skype mobile client for Skype-only calls--I found it has noticeably higher audio quality and lesser lag. Fring
Web Browsing: By far, Opera Mini delivers a super Web browsing experience on the mobile phone. It is light on resources, fast, and generates lesser data traffic compared to the standard IE Mobile browser (therefore lower phone bills). Download it here.
Image viewing: I use an application called S2V to browse and view photos on my phone. It nicely mimics the 'finger flick' method of browsing and viewing photos, and is fun to use. Download it here.

Freeing memory: Because today's mobile phones are capable of running several programs simultaneously, managing the way they use your phone's memory is important--if several applications hog memory, other important programs will be unable to start or may even crash. The solution is to use a memory manager that unloads unnecessary files from memory and frees up space for other applications that need it. I've had the best experience with Oxios Memory--a convenient, fast and effective memory optimizer. Download it here.

Friday, October 10, 2008

Hyperfocus: Everything's clear now

TheGrove_Hyperfocus There's this interesting (and pretty cool-sounding) concept in photography called Hyperfocus. Hyperfocus is a physical property of a given lens which, when fixed at a certain focal point and set at a certain aperture, makes everything from half that distance to infinity appear in sharp focus! Too much to digest? Let's throw in some numbers to make it clearer. If I'm using a 50mm lens and I set the aperture to f/22, when I focus the lens to a distance of 20 feet, everything in the scene from 9'6" all the way to infinity will be in sharp focus. Sounds interesting? If you're a landscape photographer, it sure should.

Let's dig a little deeper. Lenses are strange and wonderful things--there so much of physics involved in them that its easy to get lost in those numbers if you look beneath the surface. Hyperfocus is one such concept that is deeply rooted in mathematics, and there's plenty of information out there if you're interested in digging deeper. But what's more practical are the actual settings for your camera and lens combination that result in a hyperfocal photo. Theoretically, you can set virtually any camera to hyperfocus--even your point-and-shoot digicam. All you need to know are the focal length, f-number, and the circle of confusion for your particular camera/lens combination. The first two parameters are straightforward, but what's this 'circle of confusion'? Basically, it's the smallest clear optical spot that a lens can make. So if you have a magnifying glass and you're focusing sunlight on a hapless crawling creature, the smallest spot you create (measured in mm) is the circle of confusion of that particular lens. In a digital camera, this spot is influenced by the lens and its optical characteristics. If you're interested in calculating the hyperfocal distance of your camera, use this equation here. But wait, there's a quicker way--generate a pre-defined chart of hyperfocus settings for your particular camera! The good folks at the dofmaster Web site have done all of the mathematical heavy lifting, and you can now create a custom hyperfocus chart for your camera model here. Simple.

Cameras don't have just one hyperfocal distance--this distance changes depending on the specific f-stop and lens focal length combination. This lets you select the best combination for your particular use. For example, the technique I find most convenient for hyperfocussing my D40 and its stock 18-55mm lens is:

  1. Set the zoom to 18mm.
  2. Set the aperture to f/16.
  3. Manually set the focus to 4 feet (I do this by holding my camera to my chest and auto-focusing on my shoes--I memorized the 4-foot mark. Then I set the lens to manual focus using the A/M switch.)
  4. Point the camera at the scenery and shoot!

I used the chart referenced earlier to figure out this set of hyperfocus settings. At these settings, everything from 1'10" in front of my camera to infinity is in sharp focus. Click the photo at that opening of this story to see what hyperfocus looks like. It's especially apparent when you have plenty of objects in the near and far field--all in sharp focus.

Monday, October 6, 2008

A time-saving file management tool

More than any of office, e-mail or browsing software we use each day, a large part of our time at the computer is actually taken up by mundane file management activities. Tasks such as copying documents between locations on your computer, renaming them, creating folders, or zipping them for e-mailing happen frequently during the day. These tasks are so menial that we often discount the time we could save if there was a quicker, more effective way to do them. After all, immediate access to your files can result in spending less time housekeeping them and more time working on them.

FreeCommander I started using a tool called FreeCommander a little over a year ago. Initially, like most people who are about to leave familiar waters (Windows Explorer) and try out something new, I was sceptical. After all, doesn't Windows Explorer serve the purpose when it comes to managing your files and folders? In my opinion: a big, emphatic, NO.

FreeCommander's functionality is similar to several other file management utilities out there. However, the immensity of functionality it offers puts it right up there among the best, and it's free. This tool is designed on a simple premise--that every file operation has a 'before' and an 'after': copying files from a folder to another, selecting a group of files and compressing them to a ZIP file...the list goes on. The FreeCommander interface consists of two large panes that effectively give you a simultaneous view of any two folders on your computer or network. The drives, current path, tools and menus are all on a single screen; no need to switch between multiple windows. You can also create several tabs--much like you can do with Web browsers today--each one displaying a different folder. With all your important folders in a single view, it's a snap to drag and drop files between these panes. No more having to click through multiple folders each time you need to locate files.

FreeCommander's feature list is too immense to describe--it's best to experience its capability first hand. Some of my favorite features include:

  • The Favorite Folder button that lets me define frequently-used folders, and reach them in two clicks.
  • Clickable folder names in the path, enabling me to directly jump into folders in the current path.
  • Powerful functionality to compare folder contents.
  • One-click access to popular system folders and applications.
  • Quick filters that let me quickly locate files within congested folders.
  • An integrated FTP client that displays FTP folders as local folders.
  • Powerful file selection capabilities (select all files with the same extension, for example).
  • The ability to copy the application folder to a thumb drive and use it.
  • Keyboard shortcuts for virtually every function.
  • Plenty of customization options to suit individual needs.

Use this application for half a day and I challenge you not to get hooked!

Friday, October 3, 2008

BIG panoramas!

Hollywood BlvdVery often we come across a breathtaking expanse of scenery that just begs to be captured for posterity. A sunset at the beach, a gaping valley during a hike in the hills or even a city view from the 20th floor can lend itself to a stunning panorama photo. Unfortunately, not all cameras are equipped to do justice to such photo ops. Once again, digital tools come to the rescue to help you grab that vista with even the humblest of digital cameras. The solution is to 'stitch' multiple images together into one king-size photograph. The photograph above is of Hollywood Boulevard, taken with a Nikon D40 DSLR using the technique described below.

During my Canon PowerShot A60 days, I used a bundled application that enabled me to capture several overlapping photos of a scene, and stitch them together into one composite photograph. But this software (like most other similar bundled panorama applications) was not very reliable, and I often ended up with badly distorted pictures. Then I discovered a fantastic imaging utility created by a Canadian student as part of his PhD project -- it's called AutoStitch. The amazing thing about this tool is its reliability, and predictably fantastic results. After downloading this tool, all you need to do is configure a few settings regarding the size of your final stitched photograph and the JPEG compression quality. Then you simply point the tool to your source images and voilà, a perfectly stitched panorama! Here's how you do it:

Shooting the source pictures:

  1. If your camera has a manual mode, it's best to  use it so that all of the images will have the same exposure and focus settings. Point your camera at a neutral area in your scenery (not too dark or bright), and note the shutter speed, aperture, ISO and focus settings. Next, set your camera to the manual mode, and use the settings noted earlier. If your camera has manual focusing, use this to prevent it from re-focusing at each shot. This way, the exposure and focus will remain fixed between your shots--this is important during the stitching process later on, and will result in higher quality. The next step is to shoot the source images.
  2. The trick is to shoot multiple images of your scenery in the form of overlapping tiles. You can start at the top left of the scene, and move up-down, then left-right. If it's a simple horizontal pan, you can simply proceed from left to right (or vice versa), or Michael's house_pan if  it's a vertical pan, shoot top to bottom. AutoStitch does not mandate any specific sequence for shooting the images, but it is very important that the borders of each image overlap with the adjacent one by at least 20 percent. If the images do not overlap, it will result in errors and 'tears' in the final stitched image.
  3. This application works best when all the source images are aligned, so remember to hold your camera horizontally (or vertically) while shooting the images--tilts between shots could cause distortion in the final photo.
  4. A good way to visually 'mark' this sequence of panorama shots as separate from your other photos in your camera is to precede and follow this sequence with a blank shot (by covering the camera's lens and shooting, for example). This will make it easier to identify the source image sequence after copying them to your computer.
  5. Preferably put all the source images for each panorama in its separate folder--they will be easier to process in the next step. Remember to delete the blank shots.

The next part is easy--stitching the images using AutoStitch:

  1. You will first you need to set up a few AutoStitch options. Click Edit, then AutoStitch - SettingsOptions.
  2. Don't be daunted by the screen that comes up--most of it contains geeky processing parameters that you can safely ignore. The important settings are the Output Size in the top-left corner and the Other Options in the bottom-right corner. Click the adjoining screenshot for a larger view.
  3. In the first, set the output size to what you want--1600 pixels wide is a good place to start. In the Other Options, select the System Memory setting that best matches how much RAM your computer has, and select the JPEG Quality to 100. Both these settings will affect the processing time for your panorama.
  4. Next, make sure the Auto Crop and Auto Straighten boxes are checked and click OK.
  5. Finally, click File and Open. Navigate to the folder on your hard disk that contains the source images for the panorama. Select the source images, and click Open. Note: Do not select any other images other than the source images, or it would result in an error.

You should now see a progress bar indicating each phase of the image processing as the application crunches through the source images. After it's through, you will find the final panorama in the same folder as the source images.

Check out some examples of panoramas created using this software here. Happy shooting!

Related Posts with Thumbnails